Tampilkan postingan dengan label family favourites. Tampilkan semua postingan

Sabtu, 13 Juni 2020

Small Batch Amish Sugar Cookies


This is a cookie I used to bake for my children quite often when they were growing up. I used to try to have some kind of a treat waiting for them every day when they got home from school.  Funny enough I never saw myself as a baker, more of a savoury cook, but when I look back I can clearly see that I did both with an equal passion.


My original recipe for Amish Sugar Cookies makes a lot of cookies, which is great when you have five hungry children snapping at your heels, but not so great when you are staring at an empty nest.


That doesn't mean however that we can't still enjoy these delicious treats that we used to bake for our families, and yes . . .  I did enjoy them as well. I am on a quest to try to small batch as many of my old favourites as I can. Smaller recipes to suit the smaller household.  It just makes sense and it means there is far less temptation laying around and actually a bit less waste as well.


This is a great recipe. I actually won a ribbon at the county fair back home one year with them, so you know these are really good cookies. You can leave them plain, or you can glaze them if you like.


There used to be these cookies that we could get from Ben's Bakery back home that were like a thick sugar cookie with jam in the centres. I used to love them. They were my favourite, but I have never had a recipe to make my own.  Today I added some jam to the centres of some of these to see if they might be similar . . .


Although they were very good, they were not the same, so I am still on my quest.  I strongly suspect the difference is that those ones are made with shortening. These are all butter . . .


You can leave them plain of course, but a simple glaze is a great way to dress them up just a bit, with a few sprinkles.


There is no need to go crazy.  Children love sprinkles, even the big children. 😉 Not naming any names.


If you do decide to do some with jam in the middle don't go crazy. You only need a tiny bit. I just pushed my index finger into each cookie I was adding jam to making a small identation  . . .  and then added about 1/3 tsp of my favourite strawberry jam  . . .  yes, Bonne Maman.


Not quite the traditional Amish Sugar Cookie, but then again I am quite fond of breaking barriers and stretching the realms of possibility . . .


I even glazed a few of the ones with jam in the middle just to see how it would work.  It worked rather well actually . . .


In any case these worked out really well. You get about 2 1/2 dozen which is still a lot!


As with any cookie they go very well with an ice cold glass of milk, or a hot cuppa!


Petunia approves 100%!!

Small Batch Amish Sugar Cookies

Print
Small Batch Amish Sugar Cookies
Yield: Makes 2 1/2 Dozen
Author:
Easy to make, old fashioned and delicious.  A smaller batch for the smaller family.

Ingredients:

For the Cookies:
  • 120g butter softened (1/2 cup)
  • 120ml vegetable oil (1/2 cup)
  • 95g granulated sugar (1/2 cup)
  • 65g icing sugar (1/2 cup)
  • 1 large free range egg
  • 1/2 tsp vanilla paste
  • 315g plain flour (2 1/4 cups all purpose flour)
  • 1/2 tsp bicarbonate of soda
  • 1/2 tsp cream of tartar
For optional Glaze:
  • 130g icing sugar, sifted (1 cup)
  • few drops vanilla
  • warm water to thin
  • cake decorating sprinkles

Instructions:

  1. Preheat the oven to 190*C/375*F/ gas mark 5.  Line several baking sheets with baking paper. Set aside.
  2. Beat the butter, oil and both sugars together until well blended.  Beat in the egg and the vanilla. Sift the flour, soda and cream of tartar together and then stir this into the creamed mixture a bit at a time until well combined.
  3. Drop by walnut sized balls onto the prepared baking sheets, 2 inches apart.  Bake for 8 to 10 minutes until lightly brown around the edges.
  4. Remove to a wire rack to cool completely.
  5. For the glaze whisk all ingredients together until smooth. Dip the tops of the cooled cookies into the glaze allowing any excess to run off.  Sprinkle with the sprinkles and allow to set.
  6. For optional jam sugar cookies, using your forefinger make a dip in the centre of the cookies prior to baking and fill with 1/3 teaspoon of your favourite jam. Bake as above.
Did you make this recipe?
Tag @marierayner5530 on instagram and hashtag it #EnglishKitchen
Created using The Recipes Generator


These cookies are simple to make and they literally melt in your mouth.  I highly recommend! 


Read more

Sabtu, 04 April 2020

World's Best Chocolate Chip Cookies


A long time ago, in a place far removed from where I am now, I used to be a cook in a Manor House for a family of Millionaires.  It was a fabulous experience in many ways.  I got work and live in a very beautiful environment, using the best ingredients and equipment. 


I got to live in a very pretty English cottage set hidden in the corner of a Manor Estate and to stretch my abilities in the kitchen in amazing ways, and to experience a lifestye from the inside out that many never get to see, let alone experience. 


This cookie recipe is one I have been baking for my family for many, many years, and it is one that I was directed to bake weekly when I cooked at the Manor.  The Mr loved them.  They had to be in the cookie tin at all times  . . .


The staff loved them also.  In fact I often had to double the recipe because as soon as the other staff smelled them baking, they would arrive in the kitchen for a sneaky biccie or two or three.


They were THAT popular.  Yes, they were.  And no small wonder  . . .


Crisp edged and buttery, with a slight chew in the middle . . .


Abundantly filled with chocolate chips.  Why ever be stingy with something like that?  Can there ever be too many?  (I like the Costco ones.)


Beautifully moreish on the first day, and the second day, third day  . . .  just any day.


My children loved it when I added plenty of raisins and toasted walnuts  . . .


The Mr liked them plain with just the chocolate chips and perhaps some toasted pecan nuts . . .


I love them both ways, with just chocolate chips, or with chocolate chips and pecans, or which chocolate chips, raisins and walnuts.  These are the perfect way to say I love you to anyone. Our next door neighbour has been extremely kind to us over these past few weeks. Half got send over for her and her son to enjoy.

Needless to say . . .  she was in cookie heaven.  And that is just one of many reasons I consider these the World's Best.

World

World's Best Chocolate Chip Cookies

Yield: makes 48
Author:
I like to call these the perfect chocolate chip cookie.  Of course it depends on what your definition of perfect is in a cookie.  If you are looking for buttery, crisp and stogged full of chocolate chips and nuts, then you are in the right place.

Ingredients:

  • 2/3 cup of butter (151g)
  • 2/3 cup of vegetable shortening (145g)
  • 1 cup of white sugar (191g)
  • 1 cup of soft light brown sugar, packed (201g)
  • 2 large free range eggs
  • 1 tsp baking soda
  • 1 tsp salt
  • 2 tsp vanilla
  • 3 cups flour (420g) (may need more, if you think your dough is too stick, stir in up to half cup (70g) more)
  • 12 ounces milk chocolate chips
  • 6 ounces of semi sweet chocolate chips
  • 1 cup toasted and chopped pecan nuts (120g)
  • (Sometimes I like to add sultanas, 1 cup (151g) will do the trick)
  • (You would add them along with everything else)

Instructions:

How to cook World's Best Chocolate Chip Cookies

  1. Pre-heat the oven to 190*C/375*F/gas mark 5. Lightly grease several baking sheets, or line with baking parchment. Set aside.
  2. Cream together the butter, shortening and both sugars until well combined and fluffy. Beat in the eggs, one at a time. Then stir in the vanilla. Sift the flour together with the baking soda, and salt. Stir this in, mixing all together well. Stir in the chocolate chips and nuts.
  3. Shape tablespoons of the dough into balls with your hands and place onto the baking sheets, leaving about 2 inches between each one. (The dough will be a bit sticky, but just keep washing your hands.) I like to roll mine into balls because it results in pretty uniform shaped cookies. You can just drop them onto the cookie sheets by the tablespoonful if you wish.
  4. Bake for 10 to 11 minutes, rotating the cookie sheet half way through the baking time. They are done when they are set and lightly browned on the bottoms and at the edges. Remove from the oven. Leave to cool for several minutes on the baking sheet, and then scoop off and finish cooling on wire racks. Repeat with remaining dough, allowing the cookie sheets to cool completely in between.
  5. Bet you can't eat just one!

Did you make this recipe?
Tag @marierayner5530 on instagram and hashtag it #EnglishKitchen
Created using The Recipes Generator


These are so, so, so good. Almost dangerous.  Nowadays I don't bake them very often because there are only the two of us and I can't keep them out of my mouth.  They do freeze well however.  But do beware they are incredibly moreish. You have been warned.  

Note - Don't be tempted to use only butter in these. You must use both shortening and butter.  That is the only way they will be as crisp edged.  I think they would be slightly greasy with just butter.


Read more

Sabtu, 29 Februari 2020

Family Favourite Banana Nut Bread


Do you have family favourites in your recipe repertoire?  I have plenty in mine. These recipes are my tried and trues.  Recipes that have been gleaned and collected through the years, handed down from family and friends. Shared recipes.  Recipes that turn out every time and that never disappoint. Recipes with a history.


Don't get me wrong. I love trying out new recipes.  I have lots saved on Pinterest to try at some point. There are some wonderful gems in the new ones that I try as well, but after a time, I do tend to gravitate back to what I have known, loved, cooked and baked for many a year.

Banana Nut Bread

Using one of these old recipes is like visiting with a long lost friend.  A companion that has kept you company for many, many years.  Recipes like this are usually attached to fond memories, be they of family members or of friends.


This recipe I am sharing today is so old that I can no longer remember where it came from. It is one that I have been baking since before I finished high school.  I strongly suspect it is a recipe that was handed down from my grandmother to my mother, to me.  Its hand written into my Big Blue Binder  . . .


along with a bazillion other treasured recipes.  I wish that I had been a bit better at writing down the sources of these things through the years.  I guess when I was writing them down I never dreamed that one day I would be sharing them with the world!  Isn't that a magical thought?


To think that my Grandmother's banana bread recipe might could possibly one day be shared with the world. I wonder what she would think of that??  The whole idea would  actually be quite mind boggling to her, as would the idea of her granddaughter living in the UK one day! 


Most of my Grandmother's recipes were written on the backs of envelopes or on scraps of paper.  There were no instructions included, just a title and list of ingredients and measures, and sometimes very vague measurements at that . . .  things like butter the size of an egg . . . or five cents worth of flour. Recipes she might have shared with friends along with cups of tea and conversations . . .  or maybe even recipes which had been handed down from her own mother  . . .


I actually remember my Great Grandmother.  She was this tiny little white haired lady, as tiny as a bird, slightly stooped over,  with dark wire glasses.  This was way back when a grandmother looked like a grandmother.  She had been a farmer's wife and the community mid-wife in her day. Oh what I would give to be able to sit down and talk about cooking and recipes with her.


She passed  away on Christmas Eve in 1959.  I remember the time very well. My mother, sister and I were staying with my maternal grandparents, who my great grandmother had also lived with in her old age. She was in a bed in the back bedroom of the house, where everyone was gathered.  They kept shooing me out of the room.  I expect I was being a bit of a nuisance. My mother wasn't allowed in the room because she was pregnant with my younger brother, and there was some wierd idea that my mother's pregnancy would be affected in some negative way by being in the presence of someone who was in the process of passing over.  They were a superstitious lot.


That was back in the day when generations of people lived in and shared the same house.  In that modest home there was my Great Grandmother, my Grandparents, my Aunt Freda, her husband Harold and their wee boy Danny, along with my mother, sister and myself.  As I recall it only had four bedrooms and an outdoor loo. 


I can remember getting washed at the kitchen sink, whilst standing on a stool . . .  while wood snapped and crackled in the kitchen wood stove. . . .  the smell of the old linoleum floor and the noise it made when you walked across it.  It was lovely and warm in that kitchen. There was a huge trap door in the floor below the lineoleum which led down into the root cellar beneath the house. The lineoleum would be rolled up to get to it. My grandfather kept his home smoked hams and bacon and barrels of Kraut down there, along with my grandmother's preserves and pickles.  There was probably plenty of root vegetables as well.


There was plenty of love in that house and lots of simple, but very good food.  It was 60 years ago this next Tuesday, on the 3rd of March, my brother made his entry into the world while we were living in that house.  I remember dancing around in the kitchen holding onto my 3 year old sister's hands, and singing out with joy, "We have a baby brother!"  It was such an exciting time!


And none of that has anything to do with Banana Bread, other than the fact that as much as we like to try new things, there is still a great great value to be found in the old.  Things like this old family favourite Banana Bread.

Yield: 2 loaves (8 X 4 inch)
Author:

Family Favourite Banana Nut Bread

Family Favourite Banana Nut Bread

I like to try new things, but I keep going back to the classics.  Simply because they're the best. One to eat now,and one to gift or freeze.

ingredients:

  • 280g plain flour (2 cups)
  • 1 1/2 tsp baking powder
  • pinch salt
  • 120ml vegetable oil (1/2 cup)
  • 195g granulated sugar (1 cup)
  • 2 large free range eggs, lightly beaten
  • 4 medium, very ripe, bananas, peeled and mashed
  • 120g chopped toasted walnuts (1 cup)

instructions:

How to cook Family Favourite Banana Nut Bread

  1. Preheat the oven to 180*C/350*F/ gas mark 4.  Butter two 8 X 4 inch non-stick loaf tins. Set aside.
  2. Sift the flour, soda and salt together in a bowl.
  3. Whisk together the sugar, oil, eggs and vanilla. Stir in the mashed banana combining well together.  Add the flour mixture and  stir together to blend completely.  Stir in the walnuts.
  4. Divide the mixture between both of the baking tins.  Smooth the tops.  Place on a baking sheet and bake in the preheated oven for 35 to 45 minutes, or until a toothpick inserted into the centre of each comes out clean.  Allow to cool in the tins for 10 minutes before tipping out onto a wire rack to finish cooling completely.
  5. Slice to serve, with or without butter.

NOTES:

Use the ripest bananas you can. If they look like they need to be thrown out, then they are perfect for banana bread. Bread can be stored, wrapped tightly, for up to 5 days. Alternately you can freeze it wrapped in plastic cling film, and then in aluminium foil for up to 3 months.

Did you make this recipe?
Tag @marierayner5530 on instagram and hashtag it #EnglishKitchen
Created using The Recipes Generator


I like to toast my nuts before I use them in baking.  Simply pop them onto a baking sheet and into a hot oven for 8 to 10 minutes.  They are usually done when you can smell them all toasty and nutty!  have a great Sunday everyone! 


Read more

Selasa, 30 April 2019

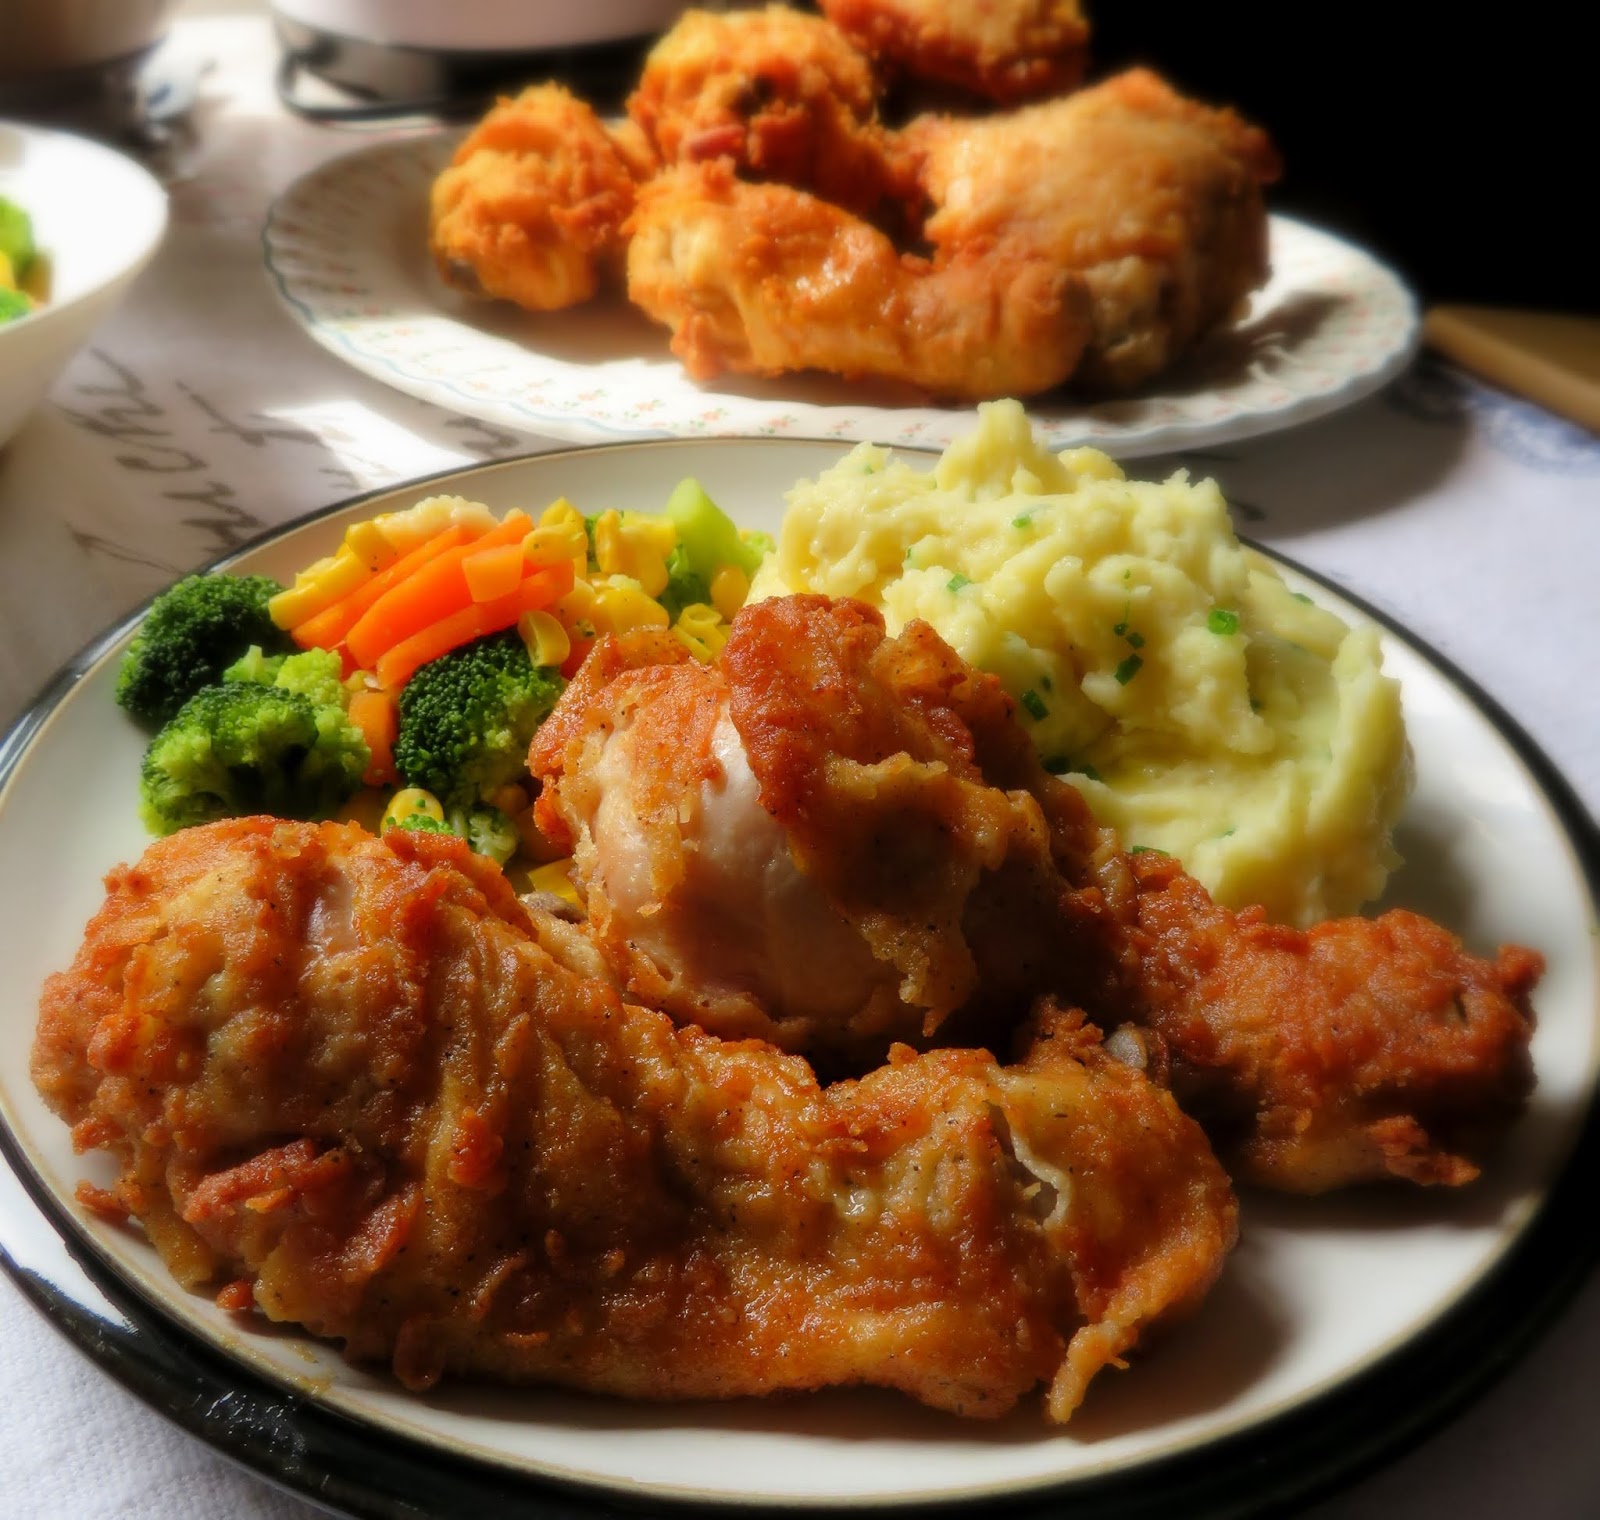
Oven Fried Chicken with Chive & Buttermilk Mash


Yes, you read that right . . .  OVEN Fried Chicken.  The eagle has landed and my oven is now up to scratch!  It took them long enough, right?  Not complaining, I am just happy its working again. I love my stove, and am not keen to start over with one I'm not familiar with.   


My Canon and I are familiar friends . . .  partners in crime . . . we know each other well and are happy to keep it that way!  To celebrate it being up and running again, I thought I would make one of Todd's favourite dinners, Oven Fried Chicken  . . . . along with Chive & Buttermilk Mash!


 He loves his mash.  He is a real mashed potato fiend and will eat them any way, any how, any time!  They are his preferred form of potato, even over chips! (Not me. I love chips/French fries!)


The chicken is a fairly simple and easy recipe, one which I have been making for years. No, it's probably not any healthier than oil fried chicken,  but it is rather tasty, and not quite as messy to cook, so . . . once in a blue moon, I cook it as a real treat!


My ex BIL used to love it when I made this chicken.  He often requested it if they were coming over for supper.  I used to make about 3 roasting trays full to feed all of us, with firsts and seconds . . .  it is that good.  Even the cold leftovers are good, which makes it great for picnics as well.


The mash is also a favourite, with plenty of buttermilk, butter and snipped chives.  The buttermilk gives it a lovely tang . . .  and of the chives a bit of an onion-like sharpness, but not as strong as an onion.  Just right.


The skin and coating on the chicken get nice and crisp in the oven.  Its really not as hard to do as frying chicken on the top of the stove.  This is a lot easier, and I think it is every bit as good.


You melt some butter and oil together in a baking pan first . . .  in the oven, until they are lovely and hot. While that is happening you mix together some flour and seasonings.  I use mixed herbs, which are a mix of different dried herbs.  Usually equal parts of basil, oregano and marjoram . . .  all of which work well with chicken.


If you can't find it in the shops, mix up your own.  Just equal parts as above.  The chicken pieces get rolled in the hot melted butter and oil and then shaken/rolled in the flour mixture before you place them back into the pan to bake in the oven.


You bake it for a time and then flip it over and bake it for a while longer, until crisp, golden brown and finger-licking, lip-smacking good!

Oven Fried Chicken


Yield: 4 - 5
Author:
This is delicious. I don't really think it's any better for you than the deep fried, kind, but once in a blue moon it makes a really tasty treat!  It's even good cold.  I usually leave the skin on, but you can remove the skin prior to dipping and coating if you wish.

ingredients:

  • 80g of butter (1/3 cup)
  • 80ml of vegetable oil (1/3 cup)
  • 140g of plain flour (1 cup)
  • 1 tsp salt
  • 2 tsp black pepper
  • 1/2 tsp garlic powder
  • 1 tsp dried mixed herbs
  • 10 pieces of chicken

instructions:

How to cook Oven Fried Chicken

  1. Preheat the oven to 190*C/375*F/ gas mark 5. Have ready a large rimmed baking sheet. Put the oil and butter on the baking sheet and set it in the oven to melt the butter while the oven heats up and you get the chicken ready.
  2. Place all of the dry ingredients into a plastic bag, shaking them together to mix.
  3. Remove the baking pan from the oven. Roll the chicken pieces, one at a time, in the melted butter and oil, then shake them in the bag of seasoned flour to coat. Set them on a piece of wax paper until you have them all coated. Once they are all coated, place them presentation side down in the melted butter/oil in the pan, leaving some space in between each.
  4. Bake in the heated oven for 45 minutes. Flip the chicken over and bake for a further 15 minutes, until crisp and golden brown.
Created using The Recipes Generator


The potatoes are just as tasty and just as easy to make.  Its just mashed potatoes, mashed together with some butter, buttermilk and seasoning  . . .


with a nice smattering of snipped chives stirred in at the end for additional flavour.  If you wanted to you could also stir in some grated cheddar cheese . . . but today, I thought we were in deep enough!

Chive & Buttermilk Mash


Yield: 4
Author:
Delicious fluffy mash, with the tang of buttermilk and sharpness of chives. Your family is sure to love this. Goes with anything and everything!

ingredients:

  • 2 pounds floury potatoes, peeled and cut into chunks
  • ( a maris piper, or a russet type of potato)
  • 2 ounces milk (1/4 cup)
  • 2 ounces butter (1/4 cup)
  • 4 to 6 ounces of buttermilk (1/2 to 3/4 cup)
  • 1 bunch of chives, finely chopped
  • salt and black pepper

instructions:

How to cook Chive & Buttermilk Mash

  1. Place the potatoes into a pot of lightly salted water and bring to the boil. Cook until fork tender and then drain well. Place back into the saucepan and shake over the residual heat of the burner to dry out. Mash well with a potato masher. Beat in the milk, butter and buttermilk until light and fluffy. Season to taste with salt and pepper and stir in the chives. Keep warm until you are ready to serve.
Created using The Recipes Generator


I simply served some mixed vegetables on the side.  Coleslaw would also be very good I think!  In any case, colour me one happy camper!  Let the baking begin once more!


Read more