Tampilkan postingan dengan label simple desserts. Tampilkan semua postingan

Rabu, 03 Juni 2020

Lemon Sandwiches with Blueberries & Cream


We are enjoying a day filled with dark clouds and plenty of rain today. We can't complain really. May was a beautiful month, but we do need rain.  Rain is a part and parcel of why this country is so lush and green! Admittedly things were starting to turn brown, and I don't like that!


With everything that is going on though, rain can be a bit depressing. With the virus, the lockdown, the riots, etc. we needed a bit of a pick-me-up, so I decided to treat us to a bit of a dessert. Lemon Sandwiches with Blueberries & Cream.


And what a fabulous dessert it is.  Thick slices of a moist and delicious lemon cake are topped with a rich yogurt cream and a sweet fresh blueberry sauce . . . 
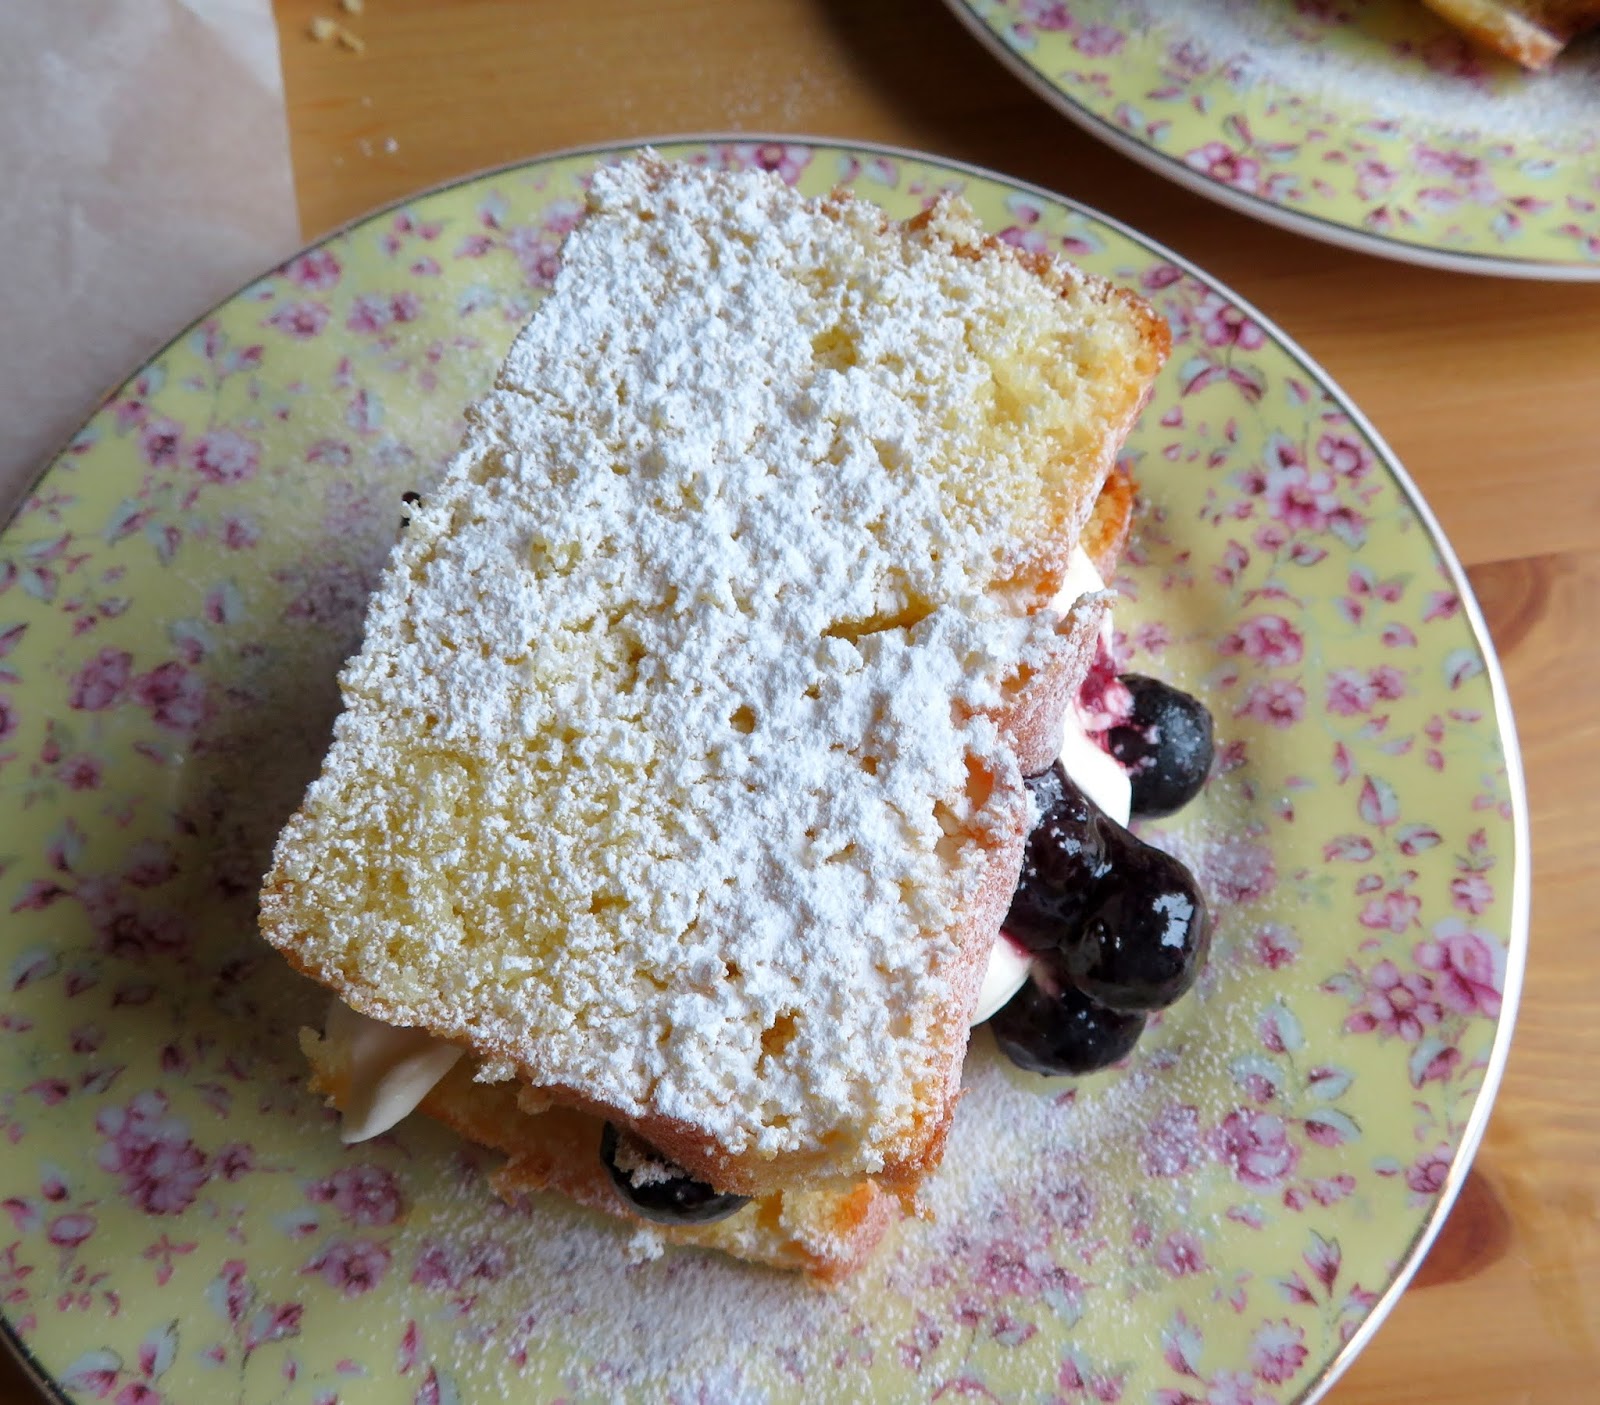

Topped with another thick slice of that gorgeous cake and then dusted with some icing sugar.  Beautifully delicious.


That cake is light and lemony. You could enjoy just the cake on its own with along with a nice hot cuppa  .  .  . and trust me, we will be doing just that.


It is moist and tender and as light as an angel's wings  . . .  that cream filling is a lush mix of whipped cream and thick greek yogurt, with just enough tang to provide a brilliant cool contrast to the sweetness of the cake  . . .


Then there is the berry portion. Oh sure, you could just put some fresh berries in the middle and nothing else  . . .  but stir them together with a bit of blueberry jam that has been loosened with a bit of lemon juice and   . . .  wow, just WOW!


Of course if you are not fond of blueberries, you could use strawberries, or raspberries.  Maybe even sliced canned peaches.  All would be pretty wonderful.


The recipe calls for a pretty long loaf tin, which I did not have.  Instead I used a 10 by 3 inch loaf tin as well as an 8 by 3 inch tin.  They were perfectly baked in about ten minutes less than the recipe states.


The recipe is one I adapted from one of my favourite cookery books, Apples for Jam by Tess Kiros.  I love her books.


All of her recipes turn out wonderfully and are simple and in their simplicity quite delicious. I have never had one fail me yet.


I have all of her books. There was only one that I really didn't care for much, the Portugese one. Piri Piri Starfish. I gave that one away, but Apples for Jam, Falling Cloudberries . . .  exquisite!

Lemon Sandwiches with Blueberries & Cream
Print

Lemon Sandwiches with Blueberries & Cream

Yield: 12
Author:
A basic lemon cake, which is great just as a cake, but put slices together in paird, with some tangy yogurt cream and sweet blueberries sandwiched in the middle and you have a company worthy dessert worth sharing!

Ingredients:

For the cake:
  • 250g butter softened, (9 ounces or  1 cup +1TBS)
  • 280g caster sugar (1 1/4 cups superfine sugar)
  • 3 large free range eggs
  • 310g plain flour (2 1/2 cups)
  • 1 1/2 tsp baking powder
  • the finely grated zest and juice of one unwaxed lemon
  • 185ml of single pouring cream (3/4 cup)
  • 1 tsp pure vanilla extract
To fill and finish:
  • 100ml double cream (3 1/2 fluid ounces)
  • 2 tsp icing sugar
  • 100ml thick greek yogurt (7 TBS)
  • 100g fresh blueberries (3 1/2 ounces)
  • 3 TBS blueberry jam
  • 1 tsp lemon juice
  • icig sugar to dust the cake

Instructions:

  1. Preheat the oven to 170*C/325*F/gas mark3.  Butter a 12 by 4 inch loaf tin really well and dust with flour.  Shake out any excess flour. Alternately you can line it with baking paper.
  2. Cream the butter and sugar together until light and fluffy.  Beat in the lemon zest, lemon juice and vanilla. Beat in the eggs, one at a time.  Sift the flour and baking powder together with a pinch of salt.  Whisk into the creamed mixture alternately with the cream, until you have lovely smooth batter.  Spoon the batter into the prepared pan.
  3. Bake for one hour and ten minutes until a skewer poked into the centre comes out clean. Leave to cool in the pan completely.
  4. To make the filling. Whisk the jam together with the lemon juice to loosen.  Fold in the fresh berries. Set aside to macerate.
  5. Whip the cream with the icing sugar until soft peaks form.  Fold in the yogurt.
  6. Cut the cake into 1/2 inch thick slices and sandwich together with a dollop of the cream/yogurt mixture and a nice spoonful of the berries. Dust the top with icing sugar and serve.
Did you make this recipe?
Tag @marierayner5530 on instagram and hashtag it #EnglishKitchen
Created using The Recipes Generator


Hmmm . . .  I was just on Amazon going through reviews on my cookbook and found this: 


Reviewed in the United States on January 20, 2020
Intellectual property rights are real. I did not order this book to support a blogger who cannot even attribute ownership of recipes. I returned it asap. This is not common knowledge for making ganche- these are special and unique recipes that real chefs made up. Buy this book to support thief. 
 
DUH??? I beg to differ.  Somebody is being very mean-spirited here. There isn't even a recipe for ganache in the book?  Add to that the fact that my publisher hasn't even been able to print a hard copy since last summer due to their loss of a printing company, it is highly unlikely that this person even bought a copy, let alone returned it right away. Why are people so mean? I spent years working on that book. It was a labor of love for me. Anyone who reads my blog knows I always attribute recipes that I use from other's . And as far as Ganache goes, anyone who has been to culinary school knows how to make it. It is a pretty basic recipe that every student is taught.  This is about the time that someone started marking all of my recipe posts on my facebook page as Spam. I think I know who that was now.  Sigh  . . .


Read more

Jumat, 28 Februari 2020

Pain Perdu with Mixed Berries


What is Pain Perdu.  Translated from French into English, the words mean Lost Bread.  It is a fancy name for French Toast, which was a great way of using up stale bread in the past. French toast is normally seen as a breakfast dish, and this certainly could be served for breakfast, but when you choose to make it with Brioche bread it becomes a bit more special and actually makes for a very fine dessert.


Brioche bread is rich and sweet and lends itself beautifully to dishes like this.  Soaked in the egg and milk it takes on an almost custard-like texture, very similar to bread pudding  . . .


But of course, cooking it this way is a lot faster than making a bread pudding.  So,  if you are looking for a hearty dessert that is quick and easy, as well as being delicious, this is the dessert for you! 


Our Brioche bread here in the UK is actually only about 4 inches square in size, so when sliced the slices are not overly large.  I cut my slices about 1 inch thick to use, which was absolutely the perfect size of thickness for this.


They were dipped in a simple mixture of eggs, milk and vanilla paste. I toasted each triangle on both sides in foaming butter, and I confess,  I also toasted the cut edges as well, along the centre, for an even nicer finish. Not necessary of course, but I thought it looked pretty.


You could serve this with syrup or chocolate sauce if you wanted to.  Chocolate sauce with vanilla ice cream would be very nice. In that case I would use sliced bananas instead of berries.


We enjoyed it just plain with a dusting of icing sugar and a mix of blueberries and raspberries.


You could use sliced peaches and a raspberry coulis sauce, which you could call Peach Melba Pain Perdu.


Caramel sauce would also be nice, again with bananas,  resulting in an almost  Banoffee-like  touch!


Of course a dusting of icing sugar really sets it off nicely.


I can't think of too many people that would turn their noses up at this dessert. Of course, it goes without saying that it is a semi-hearty dessert, which makes it the perfect dessert to serve after a light supper.


And yes, it would also make for an excellent breakast.  Personally speaking, I coud eat this any time of day or night.


You can save any leftovers, wrapped up, and stored in the refrigerator, simply reheating them briefly in the toaster.  You can also freeze them for serving at a later date.  Just thaw and warm through gently in a frying pan. Easy peasy.

Pain Perdu with Mixed Berries

Pain Perdu with Mixed Berries

Yield: 4
Author:
Pain Perdu makes a great breakfast but with a scoop of ice cream or a dollop of Greek yogurt and some fresh berries, it also makes a great dessert!

ingredients:

  • 4 thick slices of sweet brioche bread
  • 2 large free range eggs
  • 6 TBS whole milk
  • 1 tsp vanilla paste
  • butter for cooking
To serve:
  • Icing sugar to dust
  • vanilla ice cream or Greek yogurt (optional)
  • fresh berries
  • Maple syrup (optional)

instructions:

How to cook Pain Perdu with Mixed Berries

  1. Cut each slice of brioche in half diagonally into triangles.  Beat together the eggs, milk and vanilla paste in a shallow bowl with a fork.
  2. Heat a knob of butter in a large skillet or griddle pan until it starts to foam. Working quickly, dip each side of the brioche bread into the egg milk mixture and then pop them onto the hot griddle pan.  (Mine fits all of it at once, if yours is smaller you will have to work in batches.)  Cook until golden brown on the bottom side, then carefully flip over and cook until the other side is golden brown.
  3. Arrange two triangles on each dessert plate, top with some yogurt or ice cream if using, sprinkle with berries and  dust with icing sugar.  Serve immediately.

NOTES:

For a delicious variation: Simmer 1 cup (150g) ready to eat dried apricots with the juice of one orange and 120ml of water (1/2 cup) for 10 minutes until tender.  Cut the bread as above.  Add 1/2 tsp ground cinnamon to the egg mixture.  Dip and fry as above. Serve hot with Greek yogurt and a spoonful of Apricot compote.

Did you make this recipe?
Tag @marierayner5530 on instagram and hashtag it #EnglishKitchen
Created using The Recipes Generator


We are bracing ourselves for yet another wind and rain storm this weekend. My heart goes out to all who are affected and living in flood zones. I am not sure how much more we can cope with this.  Thankfully where I live in Chester we are quite high up.  My back yard however is a quagmire. I am not complaining.  Better that than that our house be under water.


Read more

Sabtu, 25 Januari 2020

Crepes with Lemon & Sugar for Two


Continuing on with my quest to present to you smaller sized, delicious recipes, today I present some dessert crepes!


I used to be a bit intimidated by crepes. In the Christmas Market you always have that stall selling crepes and they are very popular on the continent, all at a pretty high price.  Somehow the brain fools us into thinking that is something is expensive like that we can't make them at home.


If you can make a pancake however, I am happy to say you can make a crepe!  A rose by any other name, a crepe is merely a very thin pancake without leavening, I might add. 


I was really surprised when I moved over here to the UK and ordered pancakes one day. They were crepes, not the thick fluffy ones I was used to. Those type are called Scotch Pancakes here.  Anyways, crepes . . .


Crepes are not that hard to make.  The key to making good ones is to make sure that your skillet is heated properly  from the get go.  I like to oil mine lightly, and then leave it to heat over low heat while I am mixing up my crepe batter.


You want to check that your pan is properly hot before you begin.  Once my batter is done, I use a piece of paper towel and remove most of the oil, leaving just a light film on the bottom and sides. (Use a good non-stick skillet as well!)


I always do a little test pancake crepe first.  Just a teaspoon full of batter.  Pour it into the centre of the pan, and tilt slightly. If you pan is the right temperature, it will cook to golden brown on the bottom in about 20 seconds.


If it doesn't your pan isn't hot enough. so increase the heat a bit and try again.  Once you have your skillet properly heated you can start cooking the others.


60ml/1/4 cup full of batter at a time, pour it into the heated pan, swirling and tilting it slightly to coat the bottom.  Leave it to sit, without moving it, over medium low heat until it looks dry on top, the bottom is golden brown and the edges are starting to look a bit brown.


Loosen it around the edge and carefully flip it. You can continue to cook it for about half a minute longer, just until the other side blisters a bit with some golden brown spots.  Carefully lift it out to a wire rack and start cooking your remaining three crepes, one at a time.


Each time you will want to lift them out as they cook and stack them on top of the first one on the wire rack. Why a wire rack?  The wire rack allows excess steam to escape so that they don't stick together.


This recipe makes exactly five crepes. The first one is always a bit of a trial and error thing as you work it out to get it just right.


Cooks treat I call it  . . .


Once all of your crepes are cooked you can sprinkle them with sugar and fold them in half and then into quarters.  I do like to sprinkle a tiny bit of sugar on them to finish . . .


These are gorgeous served with lemon juice squeezed over top.  Before moving over here to the UK, I would never have thought of serving them with lemon and sugar, but trust me, it works beautifully.  If you have it some fresh berries would also be nice served with these.

Crepes with Lemon & Sugar for Two

Crepes with Lemon & Sugar for Two

Yield: 2
Author:
Lacy and rich. The recipe makes five crepes as everyone knows the first one is always a test for the rest.

ingredients:

  • 70g plain flour (1/2 cup)
  • 1/2 tsp sugar
  • 1/4 tsp salt
  • 180 ml whole milk (3/4 cup)
  • 1 large free range egg, lightly beaten
  • 1 TBS butter, melted and cooled
  • 1/2 tsp vegetable oil
  • granulated sugar and lemon wedges to serve

instructions:

How to cook Crepes with Lemon & Sugar for Two

  1. Heat the vegetable oil in a 12 inch non-stick skillet for 10 minutes over low heat. Make the batter while the pan is heating.
  2. Whisk the flour, sugar and salt together in a bowl. Whisk together the milk and egg. Whisk half of this into the flour mixture until smooth, then whisk in the butter. whisk in the remaining flour mixture.
  3. Wipe most of the oil out of the skillet, leaving only a fine coating. Increase the heat to medium. Leave for a minute. Test the heat of the skillet by adding a tsp of the batter in the centre of the pan. If in 20 seconds the bottom is golden brown, the skillet is the right temperature. If too light or too dark, adjust the temperature as needed.
  4. Pour in 60ml of batter (1/4 cup). Tilt gently to cover base of the pan. Cook until the top surface is dry and the edges are beginning to turn golden brown. Gently loosen around the edges and then flip over. Cook for a further 20 seconds or so until lightly spotted golden on that side. Transfer to a wire rack and proceed to cook the remaining crepes in the same manner, stacking on the wire rack as done.
  5. Transfer stacked crepes to a large plate microwave safe plate and invert a second plate over top. Microwave for about 30 seconds on high to gently heat through. Remove the top plate and wipe dry. Sprinkle some of the remaining sugar over half of the crepe (about 1 tsp). Fold in half and then into quarters. Place onto the dried plate, Repeat with the remaining crepes, sugaring each with about 1 tsp sugar, and then dividing them between the two plates. Serve immediately with wedges of lemon for squeezing over top.

NOTES:

If lemon and sugar is not to your taste, you can fill these with whatever you want. Nutella and banana.  Peanut butter and jam. Berries and whipped cream.  The world is your oyster.

Did you make this recipe?
Tag @marierayner5530 on instagram and hashtag it #EnglishKitchen
Created using The Recipes Generator


These are just fabulously tasty.  I think you are going to love, Love, LOVE them!!


Read more

Jumat, 10 Januari 2020

Maple & Cranberry Baked Apples


 Baked Apples one of the comfort foods we like to enjoy in the Winter months.  Apples are plentiful and at their best. We don't mind having the oven on, and they are delicious and very easy to do.


I had recently gotten some fabulous Organic Dried Cranberries and Ceylon Cinnamon Sticks from Buy Wholefoods Online and I felt they would be perfect for using in this simple and easy dessert. If you are not familiar with Buy Whole Foods Online you really need to look them up. I buy all of my dried fruit from them every year for my Christmas Cakes, and other bits and bobs throughout the year. Buy Whole Foods Online is an international health food supplier, based in Minster, Ramsgate, North East Kent. They deliver top quality natural and organic wholefoods, and related healthy living products, directly to homes and businesses across the UK and Europe. I have always been very happy with both their products and their service.


Baked apples make for a lovely breakfast treat or a dessert for after your dinner. I think they are very homey and comforting. You can bake just about any apple, but today I chose to use Pink Ladies as that is what I had in the refrigerator.  You will need to core them.


I have an apple corer, but today I also wanted to keep the bottoms intact, so I just used it to punch a whole down into the apple almost through to the bottom and then I used a metal 1/4 tsp measure to scoop out the core and enough surrounding apple to give me a one inch cavity down most of the length of the apple.


You need plenty of room to hold a cinnamon stick and that buttery cranberry, oat and maple filling! There's a bit of freshly grated nutmeg in there as well. I like to buy my nutmegs whole.  They last forever and freshly grated nutmeg is far superior to the already grated stuff you can buy.  At Buy Wholefoods you can buy anywhere from 125g up to 1 kg.   (It would take you a long time to use the larger amount.)


I always cut a really shallow line into the apple all the way around it horizontally.  This helps to prevent the apple from bursting when it is baking.  You will see it when you first take the apple out of the oven, but once the apple settles it disappears pretty much.


 You could of  use ground cinnamon but I really like the way that a whole cinnamon stick uses in these.  You don't eat it of course, but it does impart a nice cinnamon flavour to the whole apple and when you are done you can use add it to a saucepan along with some orange peel, whole cloves, star anise and water to make a natural air freshener.  When we had the wood stove I always had a container filled with this simmering on the back of the stove all winter through.  It made the house smell gorgeous and put some moisture into the air at the same time.  Wood fires can be so drying.


Isn't that pretty!  You stuff around the cinnamon stick with the oat, maple and cranberry stuffing. It helps to hold the cinnamon stick in place and adds even more lovely flavours to the apples.


They bake in a small baking dish along with some boiling water and a bit of Maple Syrup.  This forms a bit of a sauce when all is said and done, which is lovely spooned over the finished apples.


Depending on the apples you use it will take anywhere from between 40 minutes to an hour for them to bake to a nice softness  . . . I like them to be just soft enough to easily push the tip of a sharp knife into them.


These were done just right in about 45 minutes.  Take them out after about 40 and check them. If you think they are still hard, cover them up and pop them back in for a little bit longer.  Nobody enjoys a hard baked apple.


I have given quantities today for only two, but you can of course double or triple the amounts if you want more.


These were just perfect with some double cream poured into the bowl with them, but custard or vanilla ice cream would also be nice. In all truth they are also very tasty just on their own.

Yield: 2
Author:

Maple & Cranberry Baked Apples

Maple & Cranberry Baked Apples

Natures comfort food. All natural and delightful served for breakfast or dessert. We like cream with them, but custard is also very nice, as is ice cream.

ingredients:

  • 2 medium sweet eating apples (I used Pink Ladies)
  • 1 TBS finely chopped dried cranberries
  • 3 TBS maple syrup, divided
  • 4 TBS rolled oats
  • 1/4 tsp grated nutmeg
  • 2 cinnamon sticks
  • 1 TBS butter
  • 120ml boiling water (1/2 cup)

instructions:

How to cook Maple & Cranberry Baked Apples

  1. Preheat the oven to 190*C/375*F/ gas mark 4.  Have ready a small baking dish.
  2. Wash and dry your apples. Using a sharp measuring spoon, or apple corer, remove the cores from the centre of the apples, leaving the base intact.  I push down with the corer to where I want it to go and then use the measuring spoon to remove the apple. You will want about a 1 inch wide cavity for filling. Lightly score horizontally around the centre of each apple.  This helps to keep them intact so that they don't burst open when baking.
  3. Mix together the dried cranberries, oats, 1/2 of the butter, 1 TBS of the maple syrup and the nutmeg.  Put a cinnamon stick in the centre of each apple and fill around the sides with the oatmeal mixture.  Put them into the baking dish. Dot the tops with the remaining butter.  Whisk together the remaining maple syrup and the boiling water. Pour around the apples in the dish. Cover tightly with aluminium foil.
  4. Bake in the preheated oven for 40 to 50 minutes until the apples are cooked through and tender.  Remove from the oven and spoon any juices in the dish over top.  Serve warm.

Did you make this recipe?
Tag @marierayner5530 on instagram and hashtag it #EnglishKitchen
Created using The Recipes Generator


I bet I probably bake apples at least once a week in the Winter months. Todd just loves them and as far as dessert goes, they are not all that unhealthy.  Low in sugar and fat, and high in fibre too! 


I got a few other things from Buy Whole Foods.  Organic Barley Flour, (which I am going to make some bread with),Pickling Spice (I am thinking pickled carrots here or red onions.  It is also great with red cabbage), Turmeric Powder (Fabulous to give you brilliant colour in a curry and  also has a great many other health benefits) and Brewers Yeast, which is another great nutritional supplement.  Try it mixed into your hot drinks or smoothies.  It is a great source of chromium which can help control your blood sugar levels. You can also add it to baked goods. 

I really would like to recommend you checking out Buy Wholefoods Online!  They are a wonderful and affordable source for nuts, seeds, fruits, health supplements, herbs, spices, personal care and alternative therapies, speciality foods, Japanese foods, dried vegetables, coconut and a whole lot more!  Their prices are very reasonable and their delivery service impeccable. They have been my go-to for a lot of things over these last few years because I can trust them, and I think you will too! 


Read more