Tampilkan postingan dengan label cookies and bars. Tampilkan semua postingan

Selasa, 09 Juni 2020

Homemade Fig Bars, small batch


One thing we both love in this house is figs.  Fresh, dried, in baked goods, diced on top of our morning oats, fresh in a salad, etc.  Figs are a  favourite in our home.


Todd really loves Fig Rolls. Do you know the ones I mean?  In North America they are called Fig Newtons.  Here in the UK they are called Fig Rolls. I suppose that is because they are basically a cookie/bar dough rolled around a sweet fig filling, flattened and cut into bars.


They can vary drastically from one brand to another.  Some might have more filling than others, but I think they are all a bit stingy with the filling to be honest.  I prefer a much higher filling to cookie ration.


There are quite a few copycat versions of them around the world wide web.  Today I adapted the best of all of them, threw in my own interpretations and made a small batch, from scratch.


Let me tell you . . . these are infinitely better than the fig rolls that you buy.  No, the filling isn't totally encased and rolled up in a biscuit dough . . .


These are more like a bar.  There is plenty of filling to cookie dough ratio  I think it is the perfect amount.


You get the sweet brown sugar dough, crumbly and buttery  . . .  both on the bottom as a bar and on the top as a crumble. NO oats in this I am afraid, but there is whole wheat and plain flours, so a bit more fibre.


The filling is perfectly ample . . . not too much, not too little.  Just right.


These are moist and crumbly and incredibly moreish, from that buttery crust to that sweet and sticky filling.


They are filled with sweet fibre, both in the crust and in the filling.  These will help to keep you regular which reminds me of an interesting story about my mom.


Mom always kept a special jar of this fig spread in the refrigerator.  She bought it at the drugstore I think, or maybe it was the health food store. She called it her medicine.  Nobody was aloud to touch it upon pain of death.


Nobody wanted to to be honest.  Medicine?  Who would take medicine on purpose!  Now that I am an older woman I begin to appreciate the importance of fibre and figs to help keep things working smoothly.


These are a fabulous way to get in some of that fibre, and in a most pleasant way.


Incredibly moreish. Trust me on this.  So much so that I am wishing I had not baked a small batch.


Never mind  . . .  I just get to bake them again.  Fresh, as and when we need want them!


Trust me when I tell you, having tasted one of these, you will never settle for a ready made Fig Newton Roll again!  Never!

Homemade Fig Bars, small batch
Print

Homemade Fig Bars, small batch

Yield: Makes 8 bars
Author:
This small batch recipe, if anything, is more delicious than the fig bars you can buy.  They are also very delicious.

Ingredients:

For the filling:
  • 4 ounces dried Turkish or Calimyrna figs (1/4 pound)
  • 240ml cloudy apple juice (1 cup)
  • pinch salt
  • 1 tsp fresh lemon juice
For the crust:
  • 53g all purpose flour (4 TBS)
  • 35g whole wheat flour (1/4 cup)
  • 1/4 tsp baking powder
  • pinch salt
  • 3 TBS unsalted butter, softened
  • 83g soft light brown sugar (6 TBS, packed)
  • 1 large free range egg yolk
  • 1 tsp pure vanilla

Instructions:

  1. First make the filling. Trim the hard stem from the dried figs and discard. Cut the figs into quarters and put them into a small saucepan. Add the apple juice and salt. Cook over medium heat until the figs are very soft and the juice is syrupy. This will take 15 to 20 minutes. There should only be about a tablespoon or two left in the pan. Stir in the lemon juice. Puree them in a small food processor until smooth, or use an immersion blander. You should have something with a thickish jam consistency.
  2. Preheat the oven to 180*C/350*F/ gas mark 4. Line an 8 by 4 inch loaf tin with some aluminium foil and butter the foil.
  3. Whisk together the flours and baking powder. Set aside.
  4. Beat the butter and brown sugar until light and fluffy.  Beat in the egg and vanilla. Stir in the flour mixture to combine well.  Divide in half and press half of the mixture into the bottom of the loaf tin.  Spread the fig mixture over top of this.  Scatter the remaining batter evenly over top and lightly press down to help it to adhere to the filling.
  5. Bake in the preheated oven for 25 to 30 minutes, until golden brown.
  6. Leave to cool completely in the tin before lifting out and cutting into bars.  Store any lefovers in an airtight container.
Did you make this recipe?
Tag @marierayner5530 on instagram and hashtag it #EnglishKitchen
Created using The Recipes Generator


Does anyone know the story behind Fig Newtons?  Here is what I found out.  I thought you might also find it intersting:  (Source, the Inventors.org)

"Charles M. Roser was a cookie maker born in Ohio. He won fame for creating the Fig Newton recipe before selling it to the Kennedy Biscuit Works (later called Nabisco). A Fig Newton is a soft cookie filled with fig jam.

A machine invented in 1891 made the mass production of Fig Newtons possible. James Henry Mitchell invented a machine which worked like a funnel within a funnel; the inside funnel supplied jam, while the outside funnel pumped out the dough, this produced an endless length of filled cookie, that was then cut into smaller pieces. The Kennedy Biscuit Works used Mitchell's invention to mass-produce the first Fig Newton Cookies in 1891.

Originally, the Fig Newton was just called the Newton. There is an old rumor that James Henry Mitchell, the funnel machine's inventor, named the cookies after that great physicist, Sir Isaac Newton, but that was just a rumor. The cookies were named after the Massachusetts town of Newton, which was close to Kennedy Biscuits. Kennedy Biscuits had a tradition of naming cookies and crackers after the surrounding towns near Boston."

So now we both know.


Read more

Jumat, 05 Juni 2020

Small Batch Bakewell Blondies


I had never heard of Bakewell anything until I moved over here to the UK.  I have always, however, had a great fondness for almond flavoured cakes and bakes.  Don't get me started on chocolate covered almonds either  . . .  I cannot resist!


I had not been here very long when I ran into Bakewell Tarts . . . .  


Little pastry cases filled with a layer of jam and topped an almond frangipane cake, and glazed with an almond iced, garnished with a candied cherry.  Todd just loves these.  LOVES LOVES LOVES  I have always found them a tiny bit cloying and somewhat too sweet.


That was my first experience with Bakewell, little did I know how very good they could actually be . . .  until I baked my own . . . you can see those here.  That was when I truly fell in love with the Bakewell combination.


Since then I have played with the flavours of Bakewell baked goods, making Bakewell Whoopie Pies, Bakewell Slices, Bakewell Scones  . . .


Raspberry Bakewell Overnight Oats, and  . . .  a traditional Bakewell Tart . . .  just to name a few of my Bakewell creations.


Each one incredibly scrummy and yummy in their own unique Bakewell ways. But what is a Bakewell supposed to be you might well ask.  Wikipedia describes it as thus: 

The Bakewell tart developed as a variant of the Bakewell pudding in the 20th century. Although the terms Bakewell tart and Bakewell pudding have been used interchangeably, each name refers to a specific dessert recipe. The tart is closely associated with the town of Bakewell in Derbyshire.


Simple, right? Wrong . . .  not so simple . . .  there are as many variants and claims to invention as there are months in the year. It is indeed a very intriguing question, one without a succinct answer except to say . . .  almond flavour figures big when it comes to Bakewell anything.


And we shall leave it at that.  This Bakewell Blondie is a small batch recipe I adapted from a full sized one I found here.   The pictures looked amazing  . . .


But in all honesty I didn't really want that much temptation laying around.  Todd can only eat so much and I didn't want to be snuffling up the leftovers myself.


So I cut the recipe in half as best as I could and baked it in a 9 by 5-inch loaf tin, which is the perfect pan for baking small batch bars.


I was really pleased with the outcome until I realised that I had forgotten to put the almonds on top before baking  . . .  not a problem.


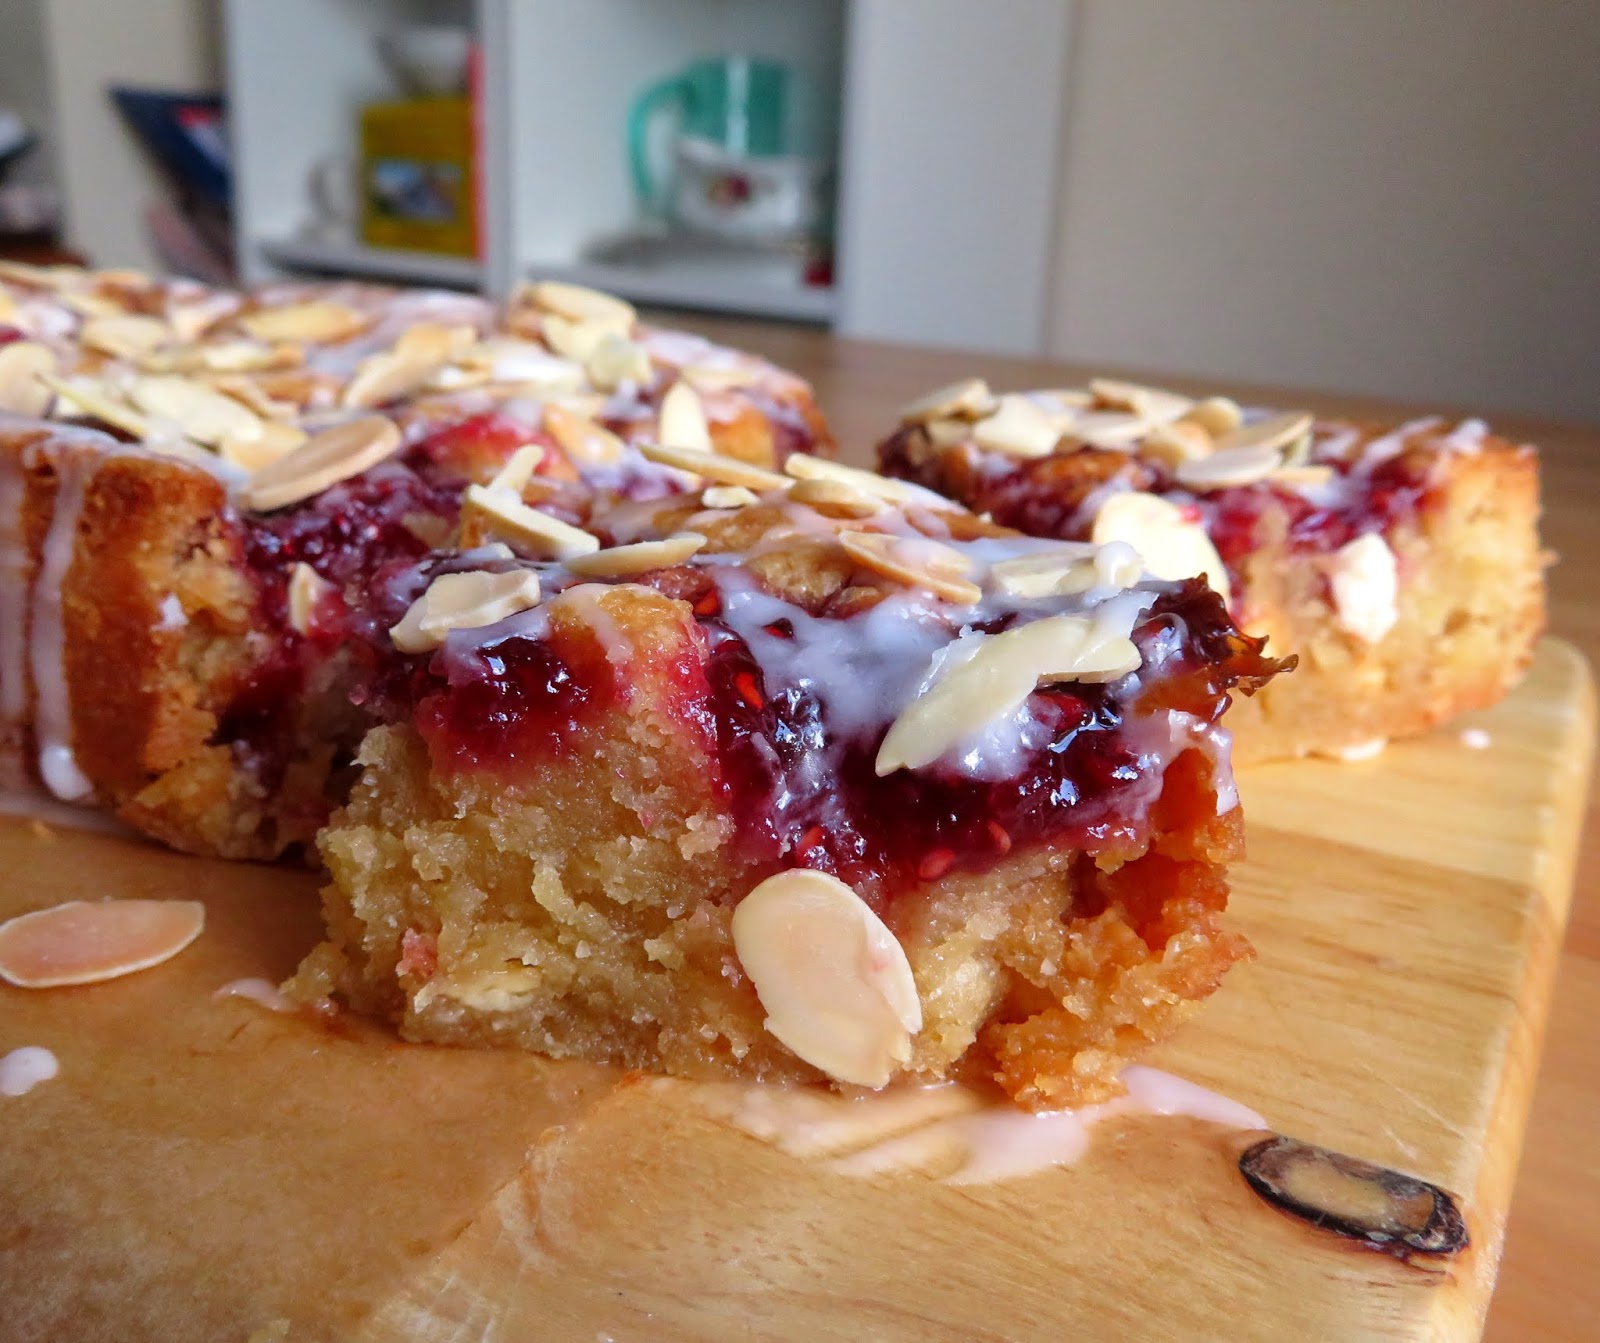
I drizzled an almond glaze over the cooled bars and then sprinkled toasted flaked almonds on top of that.  Perfect!


These are fabulous little bars.  FAB-EWE-LOUS! (And yes I know that is not the way to spell fabulous, I am trying to make a point here.  They are really tasty!)


So good in fact that I am glad I only made a small batch.  Rich, fudgy, sweet  . . .  dense and filled with white chocolate chips and almond flavours . .  . with a swirl of raspberry jam and then that almond glaze and those flaked almonds.  Can you say M O R E I S H?  I hope so because that is what these are!  Incredibly edibly moreish.

Small Batch Bakewell Blondies
Print

Small Batch Bakewell Blondies

Yield: Makes 8 blondies
Author:
These amazing brownie type of bars are fudgy, sweet and gooey with jam.  I have glazed them with an almond glaze and sprinkled toasted flaked almonds on top for a cookie bar you won't be able to resist!

Ingredients:

For the bars:
  • 120g butter, melted (1/2 cup)
  • 50g caster sugar (1/4 cup)
  • 50g soft light brown sugar (1/4 cup packed)
  • 1 large free range egg, beaten
  • 1/2 tsp almond extract
  • 50g ground almonds (1/3 cup)
  • 100g plain flour (1 cup,  minus 3 TBS)
  • 1/2 TBS cornflour (cornstarch)
  • 100g white chocolate chips (1/2 cup)
  • 8 tsp raspberry jam
For the glaze and topping:
  • 65g icing sugar (1/2 cup)
  • few drops of almond extract
  • hot water
  • a handful of toasted flaked almonds

Instructions:

  1. Preheat the oven to 180*C/350*F/ gas mark 4.  Line a 9 by 5 inch loaf tin with baking parchment, leaving an overhang.  Set aside.
  2. Beat together the melted butter and both sugars until smooth.  Beat in the egg and almond extract. Stir in the flour, corn flour and ground almonds until smooth and well mixed. Stir in the white chocolate chips. Spoon the mixture into the prepared baking tin. Smooth the top.
  3. Dollop the raspberry jam evenly spaced over top in little puddles.  Using a skewer, lightly swirl it through the blondie mixture.
  4. Bake in the preheated oven for 30 to 35  minutes, until they are done with a slight wobble in the centre. This could take longer, or it could take less time.  Start checking at 25 minutes. It all depends on how hot your oven runs.
  5.  Leave to cool completely in the tin before lifting out onto a cutting board.
  6. Whisk together the icing sugar, almond extract and just enough water to give you a thickish drizzle that you can easily flick over the top of the bars.  Drizzle it over and then sprinkle with the almonds. 
  7. Allow to set and then cut into 8 bars.  Store any leftovers in an airtight container.
Did you make this recipe?
Tag @marierayner5530 on instagram and hashtag it #EnglishKitchen
Created using The Recipes Generator


If you only bake one thing this weekend, let it be these! 


Follow my blog with Bloglovin
Read more

Jumat, 29 Mei 2020

Magic Cookie Bars, Small Batch


These bars are nothing new. I've been baking them for my family for years and years. I am sure you have as well.  I think I got the original recipe from a magazine advert back in the 1980's for Eagle Brand Sweetened Condensed Milk.


My children always loved them, and no small wonder.  They are sweet, sweet, sweet!


The original recipe makes 16 large bars. I have downsized it to make only 8, and actually you could probably cut them in half and make 16 small bites if you wanted to. (Which is probably a lot healthier sugar wise!)


I have also seen them called Seven Layer Bars because they are composed of layers of different things.  You begin with a layer of graham cracker crumbs and melted butter. We don't get graham crackers here, but digestive biscuits make a great substitute.


I weighed them out and 6 regular sized Digestive biscuits are the equivalent of 3/4 cup of crumbs, weighing 90g.


I used pecan nuts next. I like to toast my nuts before using them in anything.  They just taste nuttier if you do that small thing.  A few minutes in a hot oven on a baking sheet does the trick. They will be done when they are smelling nice and nutty.


On goes a layer of them, and then you layer on a combination of baking chips.  I used semi-sweet, white chocolate (which really isn't chocolate at all) and peanut butter chips, which is all I had.


But you can use butterscotch chips and milk chocolate chips along with the semi sweet chips. Or just the milk, white and semi sweet chips.  I don't think it really matters.  Sweet is sweet.


And if you thought they were not sweet enough, now you get to pour some sweetened condensed milk over top.  Make sure you use the sweetened condensed milk and not evaporated milk.


The major difference that sets these two canned milk products apart is sugar content; sweetened condensed milk, as the name implies, is always sweetened, while evaporated milk is unsweetened.  Sweetened condensed milk is also appreciably thicker!

Magic Cookie Bars, Small Batch

Finally you sprinkle some sweetened flaked coconut over everything.  I suppose you could use dessicated coconut, which is all you can get here in the normal shops. 


I always buy my chocolate chips and coconut from an online American ingredient supply shop called Skyco.  I have been buying things like this and a few other things for about 12 or 13 years now.


Yes, they cost a bit, but for the odd bake I think it is worth it. Its not like we eat things like this every day or even every week!  Sometimes it wouldn't even be every month.  I find as we get older we don't eat stuff like this as much.


And to be honest I mostly give it to my neighbour. She has a lad and he enjoys it.


Which is not to say I don't, but as a diabetic these would put me into a coma.  LOL


In any case if you are looking for a small batch recipe for something sweet, to either enjoy at home or gift to someone, you can't go wrong with these.


Incredibly lush.  Moreishy delish.  Much beloved.  Oh, and incredibly easy to make,bake and eat!

Magic Cookie Bars, Small Batch

Magic Cookie Bars, Small Batch

Yield: Makes approximately 8 bars
Author:
An old family favourite downsized for the smaller family.

Ingredients:

  • 60g butter, melted (1/4 cup)
  • 90g digestive biscuit crumbs or graham cracker crumbs (3/4 cup)
  • 65g chopped toasted pecans (1/2 cup)
  • 90g semi-sweet chocolate chips (1/2 cup)
  • 90g white chocolate chips (1/2 cup)
  • 90g butterscotch or peanut butter chips (1/2 cup)
  • 60g sweetened shredded coconut (3/4 cup)
  • 200g sweetened condensed milk (7 ounces)

Instructions:

  1. Preheat the oven to 180*C/350*F/ gas mark 4.  Line a 7 by 11 inch baking dish with aluminium foil and spray the foil with canola cooking spray. Set aside.
  2. Mix together the crumbs and melted butter.  Press them into the bottom of the dish in an even layer.
  3. Sprinkle  with the toasted pecans, and then the various chips, spreading them out evenly. 
  4. Spoon the sweetened condensed milk evenly over top of everything. 
  5. Finally sprinkle the coconut over top. 
  6. Bake in the preheated oven for 15 to 20 minutes or unil he op is a light golden brown.
  7. Let cool completely before cutting into bars. (I put mine in the refrigerator for about an hour before I cut them, lift them out by the tinfoil and then cut.)
Did you make this recipe?
Tag @marierayner5530 on instagram and hashtag it #EnglishKitchen
Created using The Recipes Generator


Yes, I had a bite and I will be sadly paying for it for the remainder of the day.  Todd has enjoyed one and I sent the rest next door.  They are just too irresistable for words! 


Read more