Tampilkan postingan dengan label Space Grill. Tampilkan semua postingan

Senin, 22 April 2019

Grilled Cauliflower & Broccoli Cheese


We have just enjoyed a wonderful Bank Holiday weekend, with beautiful sunny and warm weather!  Its been really gorgeous!  That makes a change, as the norm is rainy, cold and wet on a bank holiday! 


We took advantage of the sunshine to have our first BBQ of the season!  This isn't something we can usually plan well ahead of time.  You have to strike when the iron is hot, so to speak . . .  make hay while the sun shines! 


I had some leftover potatoes from the day before, which I divided between two foil packs. I just sprinkled them with some cheese and let it all melt into them while they heated on on the corner of the BBQ.  


I thought the star of the meal was going to be two thick and meaty bone in pork chops that I had brined, ready for cooking.  We got our chops at Costco and they really are lovely . . .  loin chops with the rib bone attached, each about 1 inch thick.  Simply gorgeous.  For two just use 2 cups of water and 1 TBS each sugar and salt.  Leave them to brine in it for about an hour.  Perfection.  Never a dry pork chop.  Never ever.


I was wrong however  . . .  the star wasn't the pork chops, nor was it the potatoes, both of which were VERY good!  It was the vegetables!


I took one each, broccoli crown and cauliflower head, both of ample size and I cut two "Steaks" from the centre of each.  I guess they were each about 1/3 of an inch thick, and well held together.  I just put the remainder into a plastic bag and returned it to the refrigerator where it is ready to use another time for another purpose, soup or whatnot.

Grilled Cauliflower & Broccoli Cheese

I then brushed both sides of each "Steak" with some olive oil and sprinkled them on both sides with some Italian Herb & Garlic Seasoning. 


I cooked them on a cooler part of the BBQ, turning them every now and then, until they were just crispy tender, and had lovely grill marks on them.
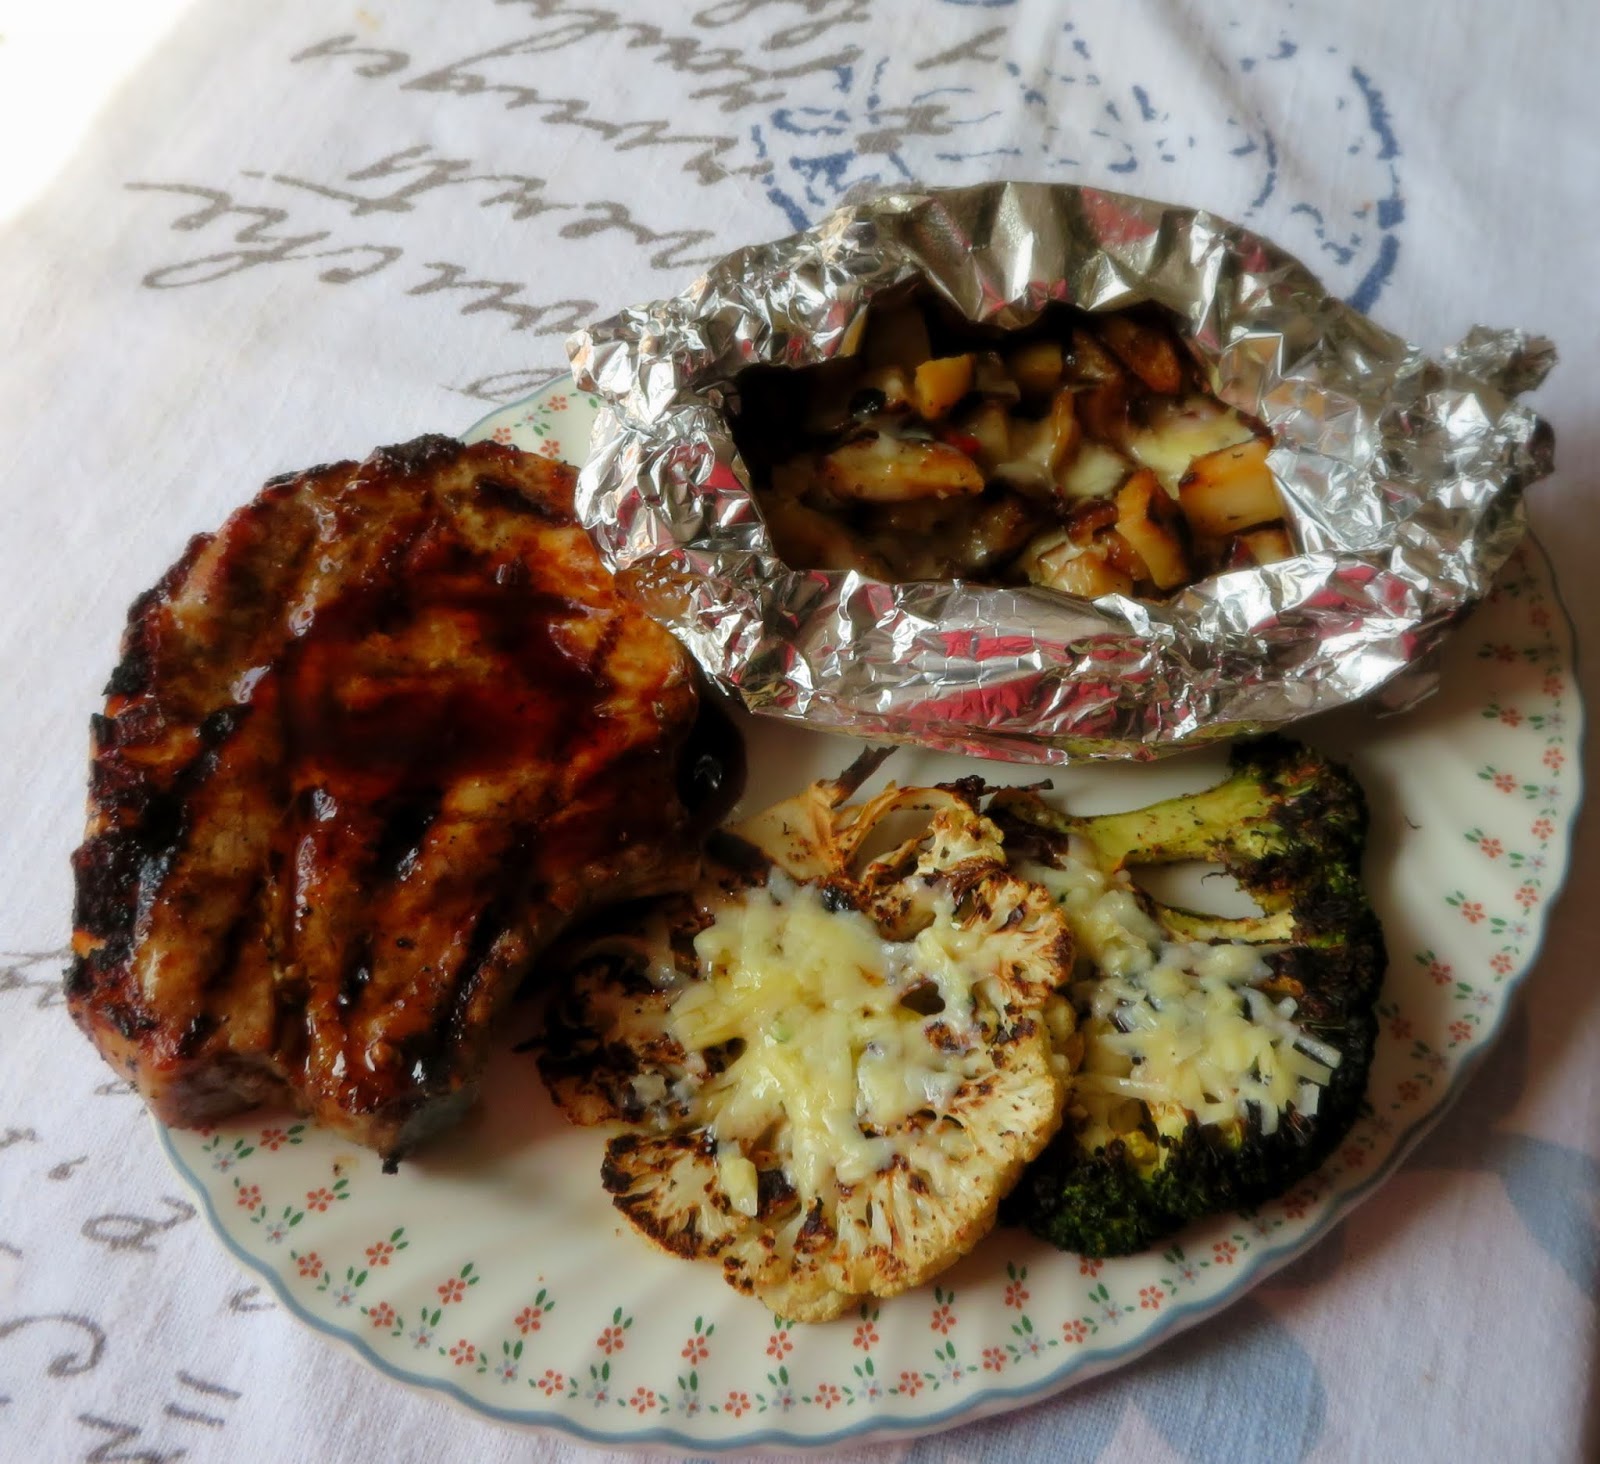

Just before they were done, I sprinkled each with about 1 TBS of grated strong Cheddar cheese, but you could use any kind of cheese you preferred, or even a combination of cheeses. These turned out EXCELLENT.  They were delicious! 


Yield: 2
Author:

Grilled Cauliflower & Broccoli Cheese

I am only giving you the quantities to make two servings, but you can certainly make more as this is more of a technique than an actual recipe!  Its delicious! Don't worry about the end bits of raw veg.  You can break them into florets to cook another day, or serve them raw with a tasty vegetable dip.

ingredients:

  • 1 large broccoli crown
  • 1 large head of cauliflower
  • olive oil to brush
  • Italian Herb & Garlic Seasoning to sprinkle
  • 4 TBS grated strong cheese or as desired

instructions:

How to cook Grilled Cauliflower & Broccoli Cheese

  1. Preheat either a grill pan or the BBQ to a moderately heat.  Taking your vegetable crowns, and working in the middle area, cut two 1/3 inch thick steaks from the centre of each. (Reserve the remaining vegetables for another use, Wrap and place in the refrigerator)  You will have 2 broccoli steaks and 2 cauliflower steaks.  Brush each on both sides with a bit of olive oil and then sprinkle with the Italian Herb & Garlic Seasoning to taste.  Place on the grill and cook until your desired doneness, turning them every so often.  Just before they are done, sprinkle each with 1 TBS of cheese and let it melt. Serve immediately. Delicious!
Created using The Recipes Generator


I know it probably wouldn't be practical to do this for a large number of people because of the amount of veg you would need, not unless you were also offering a raw vegetable tray on the side for dipping. 


Our BBQ Grill is the Space Grill 1800 3-Burner Gas GrillThis stainless steel Space Grill is a revolutionary idea for modern families with a unique fold-away design which is perfect for garden patio grilling or even using on a high rise balcony. It fits in perfectly every where, and is as truly versatile as it is beautiful!  You can either mount it on an existing load bearing wall, or you can buy a specifically designed stand to mount it on.  


We have ours on a stand which was purchased with the grill.  We got this last year and it arrived almost completely assembled.  In fact, it took Todd longer to break down our old BBQ for disposal, than it did for him to assemble the Space grill. Because we don't own our own home, but are in a rental property, we opted to have the separate stand, rather than using a wall mount. Todd found putting the stand together very easy to do.  Once the stand/or wall are ready, mounting the grill on it is a very simple process. 
  
This revolutionary, Australian designed, Chef Grade Stainless Steel grill folds out in about 10 seconds. There is no need for super human strength. Even I have found it quite easy. A simple pivot system changes space into a grill. It is really that easy!  


I can't stress enough how simple it is to install, with the lid doubling as a splash back it is perfect for those small spaces. Simply light the (independently ignited) burners and start cooking. It has two sides,  with a stainless steel  grill and a cast iron griddle plate that  is flat on one side and ridged on the other. What more could anyone ask for?

• Folds away in seconds
• Sleek modern design
• Stainless Steel for rust resistance
• Massive cooking surface (640mm x 480mm)
• Patented auto fold-down drip tray
• 3 separate individual-ignition burners
• Perfect for apartments to mansions
• Lid doubles as a splash-back
• Fast to install
• Multiple cooking plates
• Reversible cast iron flat / grill main plate
• Includes stainless flame grill plate
• No more ugly BBQ's on the deck 


I am hoping that the lovely weekend we have just enjoyed is just the tip of the iceberg and that we will have a whole summer filled with lovely opportunities to enjoy this fabulous piece of kit! 


Read more

Rabu, 25 Juli 2018

Grilled Chicken Foil Packs


We've been having a lot of fun with our Space Grill over these last few weeks.  The Weather has been just gorgeous, warm, sunny and dry.  I think this is the warmest driest summer on record in quite a long while.  Here in Chester we have had a few showers, which has been good, and in fact the other morning when I got up it was raining and there was a rainbow to greet me.  In any case this has been the perfect weather for BBQ'ing and Grilling and we have been using our grill almost every single day!  The other day I decided to try foil pack grilling on it and did a variety of chicken packs.  These are individual chicken dinners all put together in one foil packet, including the chicken and a side/sauce, etc.  Very easy to do and very easy to cook!  I did a Sweet and Sour Chicken pack, a Hunters Chicken and Potato pack, and a Honey Mustard Chicken & Sweet Potato pack, each one being very delicious in their own right.


You simply put all of the ingredients needed onto a square of heavy duty foil and seal them in, then pop them onto the grill for an easy entree with literally no fuss, no muss and very little clean up!  You just gotta love cooking like this!   Delicious and perfect for a lazy day of relaxing in the summer sunshine! 


The Honey Mustard and Sweet Potato Chicken one is delicious.  A mix of cubed sweet potato and red bell peppers is placed on the foil first.  You top this with a chicken breast (I like free range) and then a mix of honey, mustard and a special homemade Montreal Chicken Seasoning is poured over top.  Seal it up and pop it onto the grill.  20 to 25 minutes later, dinner is served!  Peel back the foil, sprinkle on some spring onion and you are set to go!  I would just prepare a side salad to go with this and have some crusty bread.  Easy peasy!


*Honey Mustard Chicken Foil Packs*
Makes 4 servings

Quite simple to make and delicious. No fuss, no muss, a meal in each packet.  


4 TBS butter, melted
2 TBS liquid honey
2 TBS Dijon mustard
1 TBS Montreal Chicken Seasoning (see below)
4 boneless, skinless chicken breasts, trimmed
2 large sweet potatoes, peeled and cut into 3/4 inch cubes
1/2 large sweet red bell pepper, trimmed and cut into 1 inch pieces
2 spring onions, trimmed and sliced 


Cut 4 large pieces of heavy duty aluminium foil.  Put the sweet potatoes into a microwavable bowl and then cook on high for 5 to 7 minutes, stirring every 2 minutes, until they tender tender when you pierce them with a fork.  Carefully divide the potatoes between the four pieces of foil.  Top with the bell pepper chunks and the chicken breasts.  Whisk together the butter, honey, mustard and chicken seasoning.  Spoon an equal portion over each piece of chicken.  Bring up two opposite sides of the foil  to meet and cover the chicken and vegetables.  Pleat tightly, allowing room for expansion.  Seal the ends.

Place on a grill you have heated to medium.  Cover with a metal lid. (make sure it has a heat resistant handle) Grill for 18 to 20 minutes, rotating the chicken every ten minutes by half a turn. It will be done when the juices run clear.  Peel back the foil and top each with some of the spring onions and serve.

Note - this can be done in a 200*C/400*F/ gas mark 6 oven.  Place on a tray and roast for 25 to 30 minutes.  
Next up Hunters Chicken & Potatoes.  This is also a cinch.  You just need a large square of heavy duty foil for each.  Place a chicken breast in the centre of each. Season it with a bit of my homemade BBQ Seasoning mix.  Toss cubed potato together with some Italian herb/garlic seasoning a bit of oil and scatter it around the chicken.  Top the chicken with some cooked bacon and seal as before.  Cook for about 20 to 25 minutes,  tear open the foil, top with BBQ sauce, grated cheese and some spring onion before serving to your drooling family!  Again, easy peasy lemon squeasy!  Some coleslaw and crusty bread would be fab with this!


*Hunter's Chicken Foil Packs*
Serves 4

Once again, simple, easy and delicious with little or no clean up involved.  


500g baking potatoes, peeled and cut into 3/4 inch cubes (1 1/4 pounds)
1 TBS Italian herb and garlic seasoning
salt and black pepper to taste
2 tsp oil
4 boneless, skinless, chicken breasts, trimmed
1 1/2 tsp BBQ seasoning (see below)
4 slices streaky bacon, cooked and halved
120g cheddar cheese, grated (1 cup)
60g BBQ sauce (1/4 cup)
2 spring onions, chopped 


Tear off 4 large pieces of heavy duty aluminium foil.

Toss the potatoes together in a bowl with the oil, Italian herb and garlic seasoning, and salt and black pepper to taste.  Season the chicken with the BBQ seasoning and place 1 piece in the centre of each piece of foil.  Divide the potatoes evenly, placing them around the chicken on the foil.  Lay bacon slices over top of the chicken.  Bring up two side of the foil to meet together over the chicken.  Seal edges making a 1/2 inch pleat to allow for expansion.  Fold in the other edges to seal.

Place onto a grill over medium heat.  Cover with a metal lid.  Cook for 18 to 20 minutes, rotating the packages 1/2 turn every 10 minutes.  The juices will run clear when the chicken is done.  Tear open on the tops. Sprinkle a portion of the cheese over the potatoes of each packet. Spread 1/4 of the BBQ sauce over each piece of chicken, garnish with the spring onions and serve.

Note - this can be done in a 200*C/400*F/ gas mark 6 oven.  Place on a tray and roast for 25 to 30 minutes.

BBQ Seasoning Mix
Makes 1/2 cup

1/2 TBS dried thyme
1 TBS garlic powder
1 TBS dried parsley flakes
1/2 tsp celery salt
2 tsp mild chili powder
1/2 TBS garlic salt
1/2 TBS black pepper
60g fine sea salt (1/4 cup)
1/2 TBS ground cumin
1 TBS onion powder (not salt)
2 TBS dried mustard powder
1 tsp cayenne pepper (or to taste)
75g soft light brown sugar (1/3 cup, packed)

Mix all of the ingredients well together and store in a glass jar away from the heat and light.  Store or up to 6 months.


Finally we have Sweet & Sour Chicken.  This is soooooooooooooo delicious and so simple!  Take a sheet of heavy duty foil for each. Pop a chicken breast in the centre.   Season it with some all purpose seasoning salt, and then top with a mix of sliced peppers and pineapple chunks.  Finally spoon the sweet and sour sauce mix over top, which is a special mix of fine shred marmalade, sweet chili sauce and rice wine vinegar.  Seal and grill, again for 20 to 25 minutes.  Sprinkle with spring onions and serve. I like to have steamed rice with this and if you wanted to you could steam some snow peas to go along as well.  Yummy Scrummy!!!


*Sweet & Sour Chicken Foil Packs*
Serves 4

Sweet, sour with a bit of heat.  These are lovely. Serve with steamed rice. 


4 boneless, skinless chicken breasts, trimmed of any fat
seasoning salt
8  TBS fine shred orange marmalade
3 TBS sweet chili sauce
3 TBS rice wine vinegar
1 each, small red and green bell pepper, cut into strips
1 (425g) tin pineapple chunks, drained (1 8-oz tin)
heavy duty aluminium foil


Cut four large rectangular pieces of foil.  Whisk together the marmalade, sweet chili sauce and rice wine vinegar.  Set aside.  Prepare your vegetables.Season the chicken all over with seasoning salt and place one piece in the centre of each square of foil.  Top each with 1 TBS of the marmalade mixture and 1/4 of the pineapple and pepper slices.  Divide the remainder of the sauce between them all.

Fold the foil over the chicken and vegetables so that the edges meet in the centre.  Seal tightly, making a 1/2 inch fold.  Seal the ends, leaving room for expansion.

Heat the BBQ grill.  Place the packets onto the grill, over medium heat. Cover with a metal lid.  (Make sure you have a heat resistant knob on it.) Cook for 20 to 30 minutes, rotating the packages every 10 minutes or so.  When done the chicken juices will run clear. Cut an X across the top of each packet and serve with some steamed rice.


Note - this can be done in a 200*C/400*F/ gas mark 6 oven.  Place on a tray and roast for 25 to 30 minutes.


Montreal Chicken Seasoning
Makes 1/2 cup

I can not find this over here so I just make my own. It comes in handy or all sorts and is also good on fish.

4 TBS fine sea salt
1 TBS black pepper
1 TBS onion powder (not salt)
1/2 TBS garlic powder (not salt)
1/2 TBS crushed red chili flakes (or to taste)
1/2 TBS dried thyme
1/2 TBS dried rosemary
1/2 TBS coriander seed, bruised

Mix all together in a small glass jar, combining well.  Seal and store in a cold dark place for up to six months.


We just love this fabulous Space Grill BBQ. This revolutionary, Australian designed, Chef Grade Stainless Steel grill folds out in about 10 seconds. There is no need for super human strength. Even I have found it quite easy. A simple pivot system changes space into a grill. It is really that easy!


Its sleek and attractive, folds away conveniently after use and comes with a fabulous cover to keep it safe from the elements.  I can also attest to the fact that it cleans up like a dream!  The parts come off very easily for wiping clean, and that patented drip tray also removes very easily for wiping out and cleaning.  No fuss, no muss!  (And you know how much I like that concept!) We are ever so pleased with it!  If you would like to know more about it, or perhaps even to purchase one for your own use, do check out the Space Grill Site.

Easy to use, space saving, easy to clean and you can also purchase a separate stand that you can bolt it to which means you can move it around rather than having it bolted to your home or garden wall.  We have a stand for ours because we don't own our own home. If we ever have to move, this beautiful baby is coming with us!  Bon Appetit!!


Read more

Selasa, 10 Juli 2018

Grilled Peanut Chicken


I love peanut flavours.  True confession here, I have a slice of toast and peanut butter every night. If I don't, I miss it.  I don't have butter on my toast, or anything else . . .  just a slice of thick whole wheat toast, lightly spread with peanut butter.  I am a happy camper. Peanut Butter is such a versatile ingredient and a real store cupboard essential, at least in my home it is! 


This recipe today is for a delicious marinade that you can make for marinating chicken.  You could also marinate other proteins, like pork, fish or even tofu in this tasty mixture. It works great, and tastes even better!!!


I just love the flavour of this marinade. Its an interesting mix of ingredients that somehow work very well together.  A delicious mix of sweet and salty . . . 


I like to use light olive oil.  Its a waste of good olive oil to use extra virgin olive oil in something like this. I use a good quality light olive oil, one which has been specifically been produced to be used in cooking.


You can use whatever brand of peanut butter you like. Myself, I prefer Skippy. Its the North American in me I guess.  I pick mine up by the HUGE jar at Costco, and I probably go through one of those a month, no kidding.  I also prefer smooth peanut butter over crunchy for this, but if you are a fan of crunchy, go for it.


Soy sauce.  I like to use the dark one because it is filled with flavour. You can get low salt ones nowadays that are really good.  Honey, just plain regular clover honey works well, and again for the BBQ sauce, just pick your favourite one.   Everything else is pretty self explanatory.  Fresh lemon juice (not the stuff in the plastic squeeze lemon, please!!!!)  Worcestershire sauce and garlic, plenty of garlic.  Its just yum, yum, yum . . .


I like to reserve some of the marinade for drizzling over the cooked chicken, or for dipping it in.  Today I grilled some tender stem broccoli along side of the chicken and served it with my Simple Sesame Noodles.  This went down a real treat!


*Grilled Peanut Chicken*
Serves 4


A delicious marinade which yields a really tasty bit of chicken. I like to make extra marinade to dip the finished chicken in when I am eating it. Its just so tasty! 


For the marinade:
120ml light olive oil (1/2 cup)
50g peanut butter (1/4 cup) (creamy or smooth, you choose)
60ml of soy sauce (1/4 cup)
85g liquid honey (1/4 cup)
2 TBS your favourite BBQ sauce
1 tsp Worcestershire sauce
the juice of one lemon
pinch cayenne pepper
3 cloves garlic, peeled and minced
fine sea salt and freshly ground black pepper to taste
4 large boneless, skinless chicken breasts, trimmed and pounded to an even size


Poke your chicken breasts all over with a fork.  Place into a shallow dish.  Whisk together the remaining ingredients.  Remove about 1/2 cup of it and set aside.  Pour the remainder over the chicken in the shallow dish, turning the chicken over to coat.  Cover and place in the refrigerator to marinate for 2 hours, or up to 6 hours. 


When you are ready to cook, Remove the chicken from the marinade, discarding any marinade left in the dish. 


Preheat the gas grill to a medium heat (Or a grill pan)  Place the chicken onto the preheated grill, top side down.  Grill for 5 to 7 minutes, flip it over and grill for a further 5 to 7 minutes or until the chicken juices run clear.  Let rest for several minutes.  Warm the reserved marinade in a small saucepan.  Drizzle over the grilled chicken and serve immediately.


I grilled my chicken outdoors on our Space Grill.  I just love this fabulous BBQ Grill.  It is just so easy to use and makes outdoor grilling fun instead of a chore.  We have had a BBQ for years, and to be honest, we have used this Space Grill more in the few weeks we have had it than all of our other BBQ grills combined throughout the last 18 years.  Seriously I use it almost every day, and sometimes more than once a day, and the main reason for that is because it is just so darned easy to use.  It literally folds out ready for use in seconds, and you can be cooking on it before you can say Jack Rabbit. Its unique patented design is probably one of the best I have ever seen.  When not in use, it tucks away, taking up very little space in the garden.  Its attractive, easy to use, and  works really well.  I love using both the ceramic coated cast iron reversible cooking tray and the stainless steel grill rods.  Today I used the tray.  When done, I find that a simple soak and then scrub with a heavy duty plastic brush gets everything back and looking great again, ready to fold down and store away until next time.  I also love that the drip tray (which is located in the bottom front, beneath the easy to use controls) is so easy to clean.  Just pop it off and wipe it out!  I would not want to be without it now!  To find out more do check out the Space Grill home page.  If you're not impressed I'll eat my hat.


Read more

Rabu, 27 Juni 2018

Moroccan Spiced Grilled Chicken & Couscous Salad


We really are having the most beautiful weather here in the UK. This is the type of summer we all dream of but only very rarely get.  It's just lovely.  Its grilling weather, the type of weather you want to be enjoying out of doors.  We get so much rain over here, that when the sun shines, we really do make hay!


Or at least cook and eat Al Fresco if we can.  Oh, I do love a good BBQ, don't you?  


I took full advantage of our new BBQ grill and temperatures in the 30's yesterday to grill our chicken out of doors.  I love our new BBQ.  Its the nicest BBQ Grill we have ever had, and I can't say enough about it!  But first the chicken! 


This lovely dish was adapted from two that I found in a cookery book I have by Clodagh McKenna entitled Homemade.  I love this book. Its a book I picked up a few years ago in a garden centre for next to nothing.


There was a recipe in the book for a Moroccan roasted chicken. The flavours sounded lovely and I thought they would adapt very well to grilled chicken pieces.  I was right.  ☺  I love it when that happens.


First I created a very simple spice paste/marinade. I put some boneless chicken thighs into a zip lock baggie and added the paste and rubbed it in really well and then popped the bag into the refrigerator to marinate for about an hour or so. I am sure you could leave it overnight if you wanted to.  I wouldn't do it for less than an hour if you want the flavour to penetrate the chicken well. 


While the chicken was marinating I made the couscous salad. It also has Moroccan flavours  . . .  I love Moroccan flavours  . . .  cumin, coriander, cinnamon, garlic . . . lemon . . . olive oil . . . so delicious.


Middle Eastern food also often has fruit in it, dried fruit, so I added sultanas and you could certainly add chopped dried apricots as well, and maybe a few pine nuts for crunch.  There are chickpeas in the salad also . . . plus parsley, red onions and a punchy lemon/olive oil dressing.  I love chickpeas (garbanzo beans) but they don't always like me!  'Nuff said! 


This salad would also be great in vegetarian style sandwiches or wraps mixed with goats cheese, and would be positively lovely served on a bed of rocket greens.  I did not have any yesterday. 


The chicken was grilled on the new BBQ over a medium high heat and was done perfectly in about 20 minutes. I used boneless, skinless chicken thighs, and they were beautiful, with slightly crisped edges, along with succulent, well flavoured and tender meat. Altogether this was quite, quite delicious!


*Moroccan Spiced Grilled Chicken & Couscous Salad*
Serves 4
 

This is simple and delicious. (I know I always say that, but its true.) You can cook the chicken on the BBQ or in the oven. Its up to you. You will need to marinate the chicken pieces for at least an hour. 


For the chicken:
2 tsp ground cumin
1 tsp ground coriander
1 tsp mild chili powder
1 tsp sweet paprika
1/2 tsp ground cinnamon
2 cloves of garlic, peeled and crushed
2 TBS lemon juice
2 TBS light olive oil
8 - 10 boneless, skinless chicken thighs
fine sea salt and freshly ground black pepper to taste 


For the couscous:
200g couscous (1 cup)
40g raisins (1/3 cup)
1 tsp ground cumin
1 tsp ground coriander
1/2 tsp ground cinnamon
350ml hot chicken stock (1 1/2 cups)
100g tinned chick peas, drained and rinsed (about 1/2 cup)
2 TBS fresh lemon juice
3 TBS extra virgin olive oil
1/2 red onion, peeled and finely chopped
2 TBS finely chopped flat leaf parsley
fine sea salt and freshly ground black pepper to taste 


First make the chicken and get it marinading.  Combine all of the spices, the olive oil, lemon juice and seasoning.  Put the chicken into a bowl or a zip lock bag.  Pour in the spice mixture and mix to coat generously. Place in the refrigerator to marinate for at least an hour. 


Meanwhile make the couscous.  Place the spices in a dry skillet and heat gently, stirring until quite fragrant. Tip into a bowl.  Add the dry couscous and raisins. Stir together.  Add the chicken stock, stir and cover with plastic cling film or a plate.  Leave to stand for 10 minutes.  Stir in the drained chick peas, lemon juice, olive oil, onions, parsley and seasoning.  Cover and chill until ready to serve. Bring to room temperature before serving. 


To cook the chicken, heat the grill or BBQ to medium high.  Place the chicken thighs onto the grill, top side down.  Grill for  10 minutes, then flip over and grill for an additional 5 to 10 minutes (depending on size) until the juices run clear. 


Serve the cooked chicken with the couscous. 


Note - To roast the chicken in the oven.  Roast on a rack in a roasting tin or baking dish for about 30  minutes at 220*C/425*F, or until the chicken tests done.  You can add chopped dried apricots to the couscous dish as well if you like. Delicious!


The Grill/BBQ we are using is the Space Grill 1800 3-Burner Gas GrillThe stainless steel Space Grill is a revolutionary idea for modern families with a unique fold-away design which is perfect for garden patio grilling or even the high rise balcony. It fits in perfectly every where, and is as truly versatile as it is beautiful!  You can either mount it on an existing load bearing wall, or you can buy a specifically designed stand to mount it on.  


It arrived almost completely assembled.  In fact, it took Todd longer to break down our old BBQ for disposal, than it did for him to assemble the Space grill. Because we don't own our own home, but are in a rental property, we opted to have the separate stand, rather than using a wall mount. Todd found putting the stand together very easy to do.  Once the stand/or wall are ready, mounting the grill on it is a very simple process.

This revolutionary, Australian designed, Chef Grade Stainless Steel grill folds out in about 10 seconds. There is no need for super human strength. Even I have found it quite easy. A simple pivot system changes space into a grill. It is really that easy! 


I can't stress enough how simple it is to install, with the lid doubling as a splash back it is perfect for those small spaces. Simply light the (independently ignited) burners and start cooking. It has two sides,  with a stainless steel  grill and a cast iron griddle plate that  is flat on one side and ridged on the other. What more could anyone ask for?

• Folds away in seconds
• Sleek modern design
• Stainless Steel for rust resistance
• Massive cooking surface (640mm x 480mm)
• Patented auto fold-down drip tray
• 3 separate individual-ignition burners
• Perfect for apartments to mansions
• Lid doubles as a splash-back
• Fast to install
• Multiple cooking plates
• Reversible cast iron flat / grill main plate
• Includes stainless flame grill plate
• No more ugly BBQ's on the deck


Jose and Ariana came over to help us get it up and running. (Todd has a hernia and I didn't want him lifting anything heavy!)  It really was very simple to assemble and get ready for use.  As Spaniards, they are no strangers to the art of BBQ/Grilling, and they fell right in love with it.  I predict after baby comes they might be buying one for their own home!  Its sleek and attractive, folds away conveniently after use and comes with a fabulous cover to keep it safe from the elements.  I can also attest to the fact that it cleans up like a dream!  The parts come off very easily for wiping clean, and that patented drip tray also removes very easily for wiping out and cleaning.  No fuss, no muss!  (And you know how much I like that concept!) We are ever so pleased with it!  If you would like to know more about it, or perhaps even to purchase one for your own use, do check out the Space Grill Site.


I really hope this lovely weather continues as I am keen to use this BBQ/Grill as much as I can this summer.  Our old BBQ really didn't perform near as well and was a real faff to get lit and use. Not so this nifty piece of kit.  We are having all the Missionaries over on Monday for a BBQ to celebrate the combination 1st and 4th of July holidays and I can't wait to show it to them!  In the meantime, I am sure we will be using it a few times before them.  With this gorgeous weather and its ease of use, there is really NO excuse not to!  Bon Appetit! 


Read more