Tampilkan postingan dengan label Teatime. Tampilkan semua postingan

Jumat, 05 Juni 2020

Small Batch Bakewell Blondies


I had never heard of Bakewell anything until I moved over here to the UK.  I have always, however, had a great fondness for almond flavoured cakes and bakes.  Don't get me started on chocolate covered almonds either  . . .  I cannot resist!


I had not been here very long when I ran into Bakewell Tarts . . . .  


Little pastry cases filled with a layer of jam and topped an almond frangipane cake, and glazed with an almond iced, garnished with a candied cherry.  Todd just loves these.  LOVES LOVES LOVES  I have always found them a tiny bit cloying and somewhat too sweet.


That was my first experience with Bakewell, little did I know how very good they could actually be . . .  until I baked my own . . . you can see those here.  That was when I truly fell in love with the Bakewell combination.


Since then I have played with the flavours of Bakewell baked goods, making Bakewell Whoopie Pies, Bakewell Slices, Bakewell Scones  . . .


Raspberry Bakewell Overnight Oats, and  . . .  a traditional Bakewell Tart . . .  just to name a few of my Bakewell creations.


Each one incredibly scrummy and yummy in their own unique Bakewell ways. But what is a Bakewell supposed to be you might well ask.  Wikipedia describes it as thus: 

The Bakewell tart developed as a variant of the Bakewell pudding in the 20th century. Although the terms Bakewell tart and Bakewell pudding have been used interchangeably, each name refers to a specific dessert recipe. The tart is closely associated with the town of Bakewell in Derbyshire.


Simple, right? Wrong . . .  not so simple . . .  there are as many variants and claims to invention as there are months in the year. It is indeed a very intriguing question, one without a succinct answer except to say . . .  almond flavour figures big when it comes to Bakewell anything.
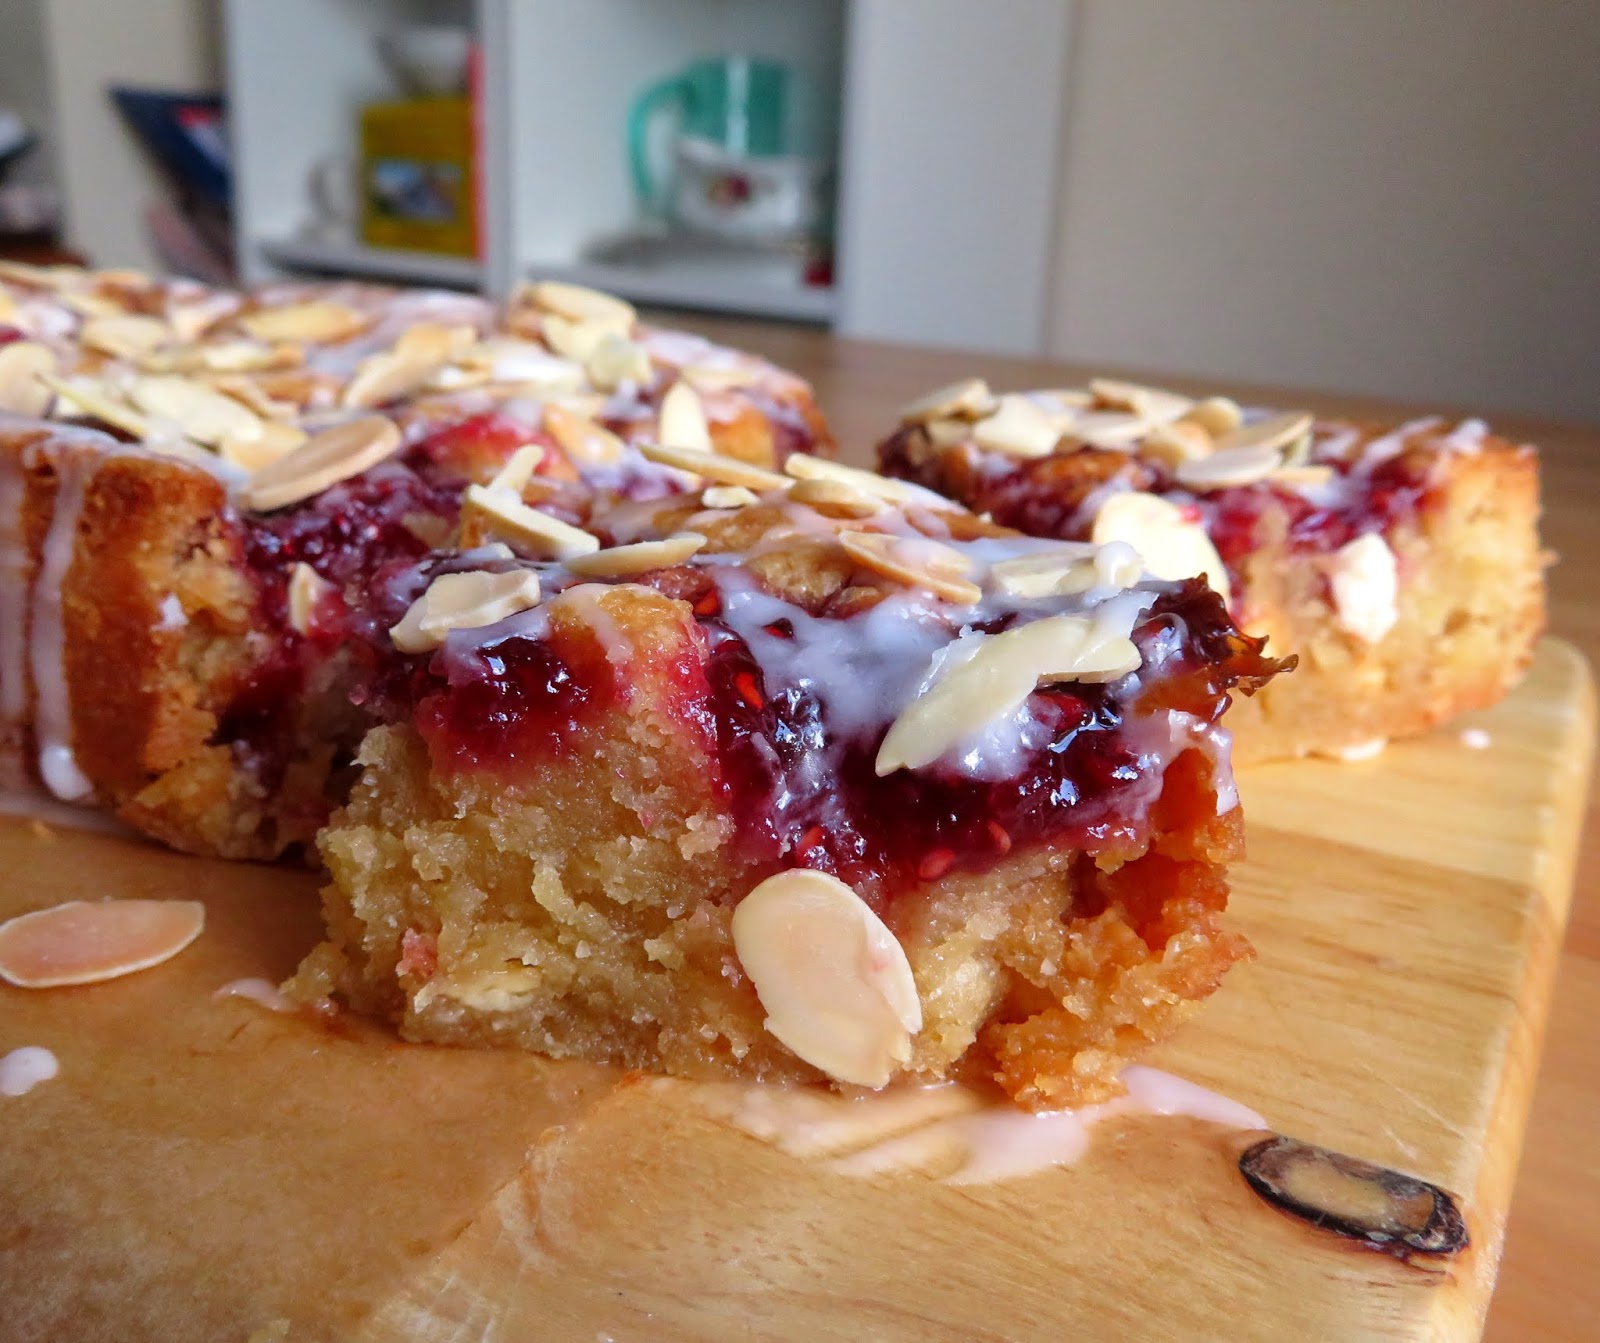

And we shall leave it at that.  This Bakewell Blondie is a small batch recipe I adapted from a full sized one I found here.   The pictures looked amazing  . . .


But in all honesty I didn't really want that much temptation laying around.  Todd can only eat so much and I didn't want to be snuffling up the leftovers myself.


So I cut the recipe in half as best as I could and baked it in a 9 by 5-inch loaf tin, which is the perfect pan for baking small batch bars.


I was really pleased with the outcome until I realised that I had forgotten to put the almonds on top before baking  . . .  not a problem.


I drizzled an almond glaze over the cooled bars and then sprinkled toasted flaked almonds on top of that.  Perfect!


These are fabulous little bars.  FAB-EWE-LOUS! (And yes I know that is not the way to spell fabulous, I am trying to make a point here.  They are really tasty!)


So good in fact that I am glad I only made a small batch.  Rich, fudgy, sweet  . . .  dense and filled with white chocolate chips and almond flavours . .  . with a swirl of raspberry jam and then that almond glaze and those flaked almonds.  Can you say M O R E I S H?  I hope so because that is what these are!  Incredibly edibly moreish.

Small Batch Bakewell Blondies
Print

Small Batch Bakewell Blondies

Yield: Makes 8 blondies
Author:
These amazing brownie type of bars are fudgy, sweet and gooey with jam.  I have glazed them with an almond glaze and sprinkled toasted flaked almonds on top for a cookie bar you won't be able to resist!

Ingredients:

For the bars:
  • 120g butter, melted (1/2 cup)
  • 50g caster sugar (1/4 cup)
  • 50g soft light brown sugar (1/4 cup packed)
  • 1 large free range egg, beaten
  • 1/2 tsp almond extract
  • 50g ground almonds (1/3 cup)
  • 100g plain flour (1 cup,  minus 3 TBS)
  • 1/2 TBS cornflour (cornstarch)
  • 100g white chocolate chips (1/2 cup)
  • 8 tsp raspberry jam
For the glaze and topping:
  • 65g icing sugar (1/2 cup)
  • few drops of almond extract
  • hot water
  • a handful of toasted flaked almonds

Instructions:

  1. Preheat the oven to 180*C/350*F/ gas mark 4.  Line a 9 by 5 inch loaf tin with baking parchment, leaving an overhang.  Set aside.
  2. Beat together the melted butter and both sugars until smooth.  Beat in the egg and almond extract. Stir in the flour, corn flour and ground almonds until smooth and well mixed. Stir in the white chocolate chips. Spoon the mixture into the prepared baking tin. Smooth the top.
  3. Dollop the raspberry jam evenly spaced over top in little puddles.  Using a skewer, lightly swirl it through the blondie mixture.
  4. Bake in the preheated oven for 30 to 35  minutes, until they are done with a slight wobble in the centre. This could take longer, or it could take less time.  Start checking at 25 minutes. It all depends on how hot your oven runs.
  5.  Leave to cool completely in the tin before lifting out onto a cutting board.
  6. Whisk together the icing sugar, almond extract and just enough water to give you a thickish drizzle that you can easily flick over the top of the bars.  Drizzle it over and then sprinkle with the almonds. 
  7. Allow to set and then cut into 8 bars.  Store any leftovers in an airtight container.
Did you make this recipe?
Tag @marierayner5530 on instagram and hashtag it #EnglishKitchen
Created using The Recipes Generator


If you only bake one thing this weekend, let it be these! 


Follow my blog with Bloglovin
Read more

Selasa, 17 Maret 2020

Lemon Puff Biscuits


One of my favourite things to eat has always been the Lemon Puff Biscuits/Cookies that you can get in the shops.  I love lemon anything anyways, but  . . .  


there is just something totally irresistable and moreish about these treats . . . with their flaky cookie/cracker-like pastry . . .  and that yummy lemon filling.  I could eat a whole pack of them myself.  Trust me, I don't, but I could!  I just find them that yummy!


I found myself craving them today.  You know how that goes.  Sometimes you just crave something that you haven't had for a while.  I haven't seen any in the shops the last while to be honest.


I did have a packet of ready rolled all butter Puff Pastry in the freezer though, and I got to thinking to myself today, why couldn't I just use that?  Why indeed!


I cut it into 1 by 3 inch rectangles . . . I can't tell you how many I got exactly because I didn't count them and some have um . . .  disappeared in the interim between my baking and filling them, and my sitting down to write this. 


Both Todd and myself have been picking at them. So much for him saying he doesn't like lemon.  Pah!  Methinks he likes it well enough!


The ones you buy in the shops are glazed with something and so I glazed mine with a mix of egg white, caster (fine) sugar and lemon juice, prior to sprinkling them with a touch of demerara sugar for crunch, and then baking them in a hot oven.  This worked beautifully.  


They came out lovely and light and perfectly golden brown with a lovely crunchy sheen/topping.


It was very easy to split them in half and fill them with a lush lemon flavoured buttercream.  Do wait for them to cool completely before you do this.  You don't want the butter cream to melt.


I wanted to be a bit generous with the filling. You almost can't see it here because it is quite a pale buttery colour, but believe me when I say that it is there . . . .


Oh boy  . . .  that combination of crisp  sweetly crunchy puff pastry and that rich lemon buttercream are a beautiful combination.  Simply beautiful  . . .


Such a beautiful thing to enjoy on a day such as this when you just want to put all that is happening in the world out of your mind  . . .  you just want to sit back with a hot cuppa and a breath of something slightly indulgent and sweet . . .


And these do fit the bill perfectly!  Just look at all of those flakey layers  . . . .


And that wonderfully rich and indulgent buttercream filling . . .  it just melts in your mouth.


They went perfectly with my cup of herbal tea . . .  today it was mint . . . a lovely pick-me-up.


Of course days like this call for even more of an indulgence so I enjoyed my tea in my Susan Branch Bluebird Mug.  I hardly ever use the mug.  Its so beautiful and I am afraid of  breaking it, but then again what is the point of having something beautiful and never using it.  Why indeed!


Lemon Puff Biscuits

Lemon Puff Biscuits

Yield: Makes quite a few
Author:
I was craving my old favourite Lemon Puffs, and decided to make my own. If anything I think these are even better.

Ingredients:

For the pastry
  • 1 sheet of ready roll all butter puff pastry
  • 1 large free range egg white
  • 2 tsp caster sugar (fine granulated)
  • the juice of 1/2 lemon
  • demerara sugar for sprinkling (turbinado)
For the filling:
  • 100g butter, softened (8 TBS)
  • 200g icing sugar, sifted (1 1/2 cups)
  • the finely grated zest of one unwaxed lemon
  • the juice of 1/2 lemon

Instructions:

How to cook Lemon Puff Biscuits

  1. Preheat the oven to 200*C/400*F/ gas mark 6.  Line several baking sheets with baking paper.  Set aside.
  2. Unroll your puff pastry. Cut it into rectangles roughly 1 inch by 3 inches in size. Place them onto the baking sheets, leaving some space in between each.
  3. Lightly whisk together the egg white,  sugar and lemon juice. You don't want it to turn foamy.  Using a pastry brush, brush some of this on top of each piece of pastry, then sprinkle each with some of the demerara sugar.
  4. Bake in the preheated oven for 12 to 15 minutes until golden brown. Don't let it burn, so keep an eye on it.
  5. Scoop off onto a wire rack to cool completely.
  6. To make the filling, beat together all of the ingredients until smooth.  Take care not to add too much lemon juice, you want a thick spreadable mixture.
  7. Split the baked pastries in half through the middle.  Spread a portion of the filling onto the bottoms of each one and top with the top pastry bit, sugared side up.
  8. Store any leftovers in an airtight container.

Did you make this recipe?
Tag @marierayner5530 on instagram and hashtag it #EnglishKitchen
Created using The Recipes Generator


Hot Mint Tea, Bluebirds, Susan Branch and Lemon Puffs . . .  it truly doesn't get much better than this!


Read more

Jumat, 25 Oktober 2019

Lemon Splits


I've been pretty laid out with my back this past couple of weeks and have not really been cooking anything new for the most part. The pain has been pretty bad, but finally today I feel like I have begun to turn the corner somewhat and so I decided to do a new recipe to share on here. Lemon Splits!


Its okay if you don't know what they are.  I had never heard of them either before I moved here to the UK.  I have always loved Lemon flavoured anything.  Those lemon puff cookies were my favourite when I was growing up.  Buttery lemon flavoured crackers put together with lemon icing. If you are a lemon aficionado you will know exactly the ones I mean!


I discovered these Lemon Splits in the grocery shop about a year or so ago. What they are is plain Welsh Cakes, without the spice and raisins, put together with a layer of lemon curd in the middle.  My goodness but they are some tasty. They don't always have them in the shops however so it is hit and miss as to if you can find them or not.  I looked for a recipe online but couldn't find one anywhere.


I decided to take the bull by the horns and create my own.  I have made Welsh Cakes in the past.  You can find that recipe here.   Welsh cakes are really good. They are like a cross between a pastry and a scone in my opinion.  Buttery with a short texture and oh so tasty, especially when served with a hot bevvie!


They are a very traditional Welsh teatime treat and you will find them all over Wales.  They are extremely good I have to say.  All of the teatime treats in the British Isles are extremely good.  They know how to bake good things! 


So what I did was make Welsh Cakes, without the spice or the raisins  . . . 

Lemon Splits

Just plain  . . . flour, butter, sugar and an egg. You might need to add a bit of milk to the dough, but my dough was perfect without it.  In fact I had to generously dust my board and pin with flour or it would have stuck too much.


I baked them on my Pampered Chef Griddle pan.  You need to heat it so that its not scalding hot and not too cool.  You can use a heavy based non-stick skillet as well.  The important thing to remember is to not have it too hot, or the outside will brown too quickly and they won't be done inside.


I heated mine over medium low and once it was heated I turned it down to low.  This worked well for me, about 2 to 3 minute per side did the trick. I knew it was time to flip them over when they started looking a bit puffy on top and were golden brown on the bottom.


When they were done they were golden brown on both sides and the edges looked dry.  That's the best that I can explain it.


You can of course make your own lemon curd to fill these from scratch and I have a darn good recipe that you can find here


But a really good quality store bought one works just fine also and sometimes that's all we have time for!


These are perfect!  We both enjoyed them very much, even the "so-called lemon hater". Methinks he doth protest too much personally!  He scarfed two down right away no problemo!  If you really don't like lemon, these would be awfully nice sandwiched together with your favourite jam as well. Ohh, black currant jam or jelly would be lovely!

Yield: Makes 12 to 14
Author:

Lemon Splits

Lemon Splits

prep time: cook time: total time:
Traditional Welsh Cakes without the raisins, sandwiched together with lemon curd. Don't worry if you don't have a griddle or hot stone to cook them on, they will cook perfectly find in a skillet with a heavy base.

ingredients:

  • 225g self rising flour (1 1/2 cups + 2TBS)
  • 110g salted butter (1/2 cup minus 1 tsp)
  • 85g caster sugar (7 TBS)
  • 1 medium free range egg
  • Milk (if needed)
  • flour to dust the cutting board
  • butter to grease the griddle (optional)
  • good quality lemon curd to fill

instructions:

How to cook Lemon Splits

  1. Sift the flour into a bowl.  Drop in the butter and rub it into the flour with your fingertips until the mixture resembles fine dry bread crumbs. Stir in the sugar with a fork. Beat the egg and stir it into the mixture to form a ball of dough, adding a splash of milk if you need it. (I did not need it.)
  2. Generously flour a board and then tip the dough out onto it, also generously flouring the dough. Flour a rolling pin and roll the dough out to 1/4 inch thickness. Cut into rounds using a 2 1/2 inch round fluted cutter.   Re-roll any scraps and cut again, until all the dough has been used up.
  3. Heat a heavy grill stone or non-stick griddle pan over medium low heat until fairly hot.  Brush lightly with butter if desired. (I didn't use any.) Add the welsh cakes and bake them for 2 to 3 minutes on one side. They should be golden brown on the bottom. Flip them over and bake for a further 2 to 3 minutes until golden brown on the other side.  Try not to have the temperature of the griddle too high or they will brown too quickly on the outside and not be cooked in the centre.  ( It was my observation that they were ready to flip over when the tops looked kind of puffy.)
  4. Remove from the pan with a spatula to a wire rack to cool. 
  5. To make the lemon splits, sandwich two together with lemon curd in the centre.  You can dust with some icing sugar to serve.  Store any leftovers in an airtight container.

Did you make this recipe?
Tag @marierayner5530 on instagram and hashtag it #EnglishKitchen
Created using The Recipes Generator


One thing I have learnt this week is that I need to slow things down a bit. I think I have been doing too much actually and so I am going to cut back a bit on the blogging, perhaps only do a recipe here 3 or 4 times a week.  I know I have said that in the past, but this time I really mean it.  There will still be quality, tasty recipes here, just not as often! 


Read more