Tampilkan postingan dengan label Breads. Tampilkan semua postingan

Sabtu, 06 Juni 2020

Grandmother's Steamed Brown Bread, small batch


For as long as I can remember and beyond Saturday night suppers back home in Nova Scotia and indeed all down the Eastern part of Canada and the US, Saturday night baked bean suppers have been the tradition.


In fact, during non-covid days, Baked Bean Suppers have always been huge fund raisers for local communities, volunteer fire departments, schools, etc.  People have always loved them.


Back where I come from Baked Beans are not humble, they are precious and speak of family, tradition and community spirit. Baked Bean Suppers, with home baked beans, ham or hotdogs, scalloped potatoes and steamed brown bread, or sometimes molasses oatmeal bread, or baking powder biscuits, or even corn bread.  These are knit into very the fibre of every maritimer.


Brown Bread is probably the most basic traditional bread served with baked beans.  Back home you can buy it in cans, baked and ready to re-heat by steaming.  Or you can make your own, which is very easy.


I had not made Brown Bread in years.  Most of all because there are only two of us in our home now. You can't get the big coffee cans I used to steam it in over here in the UK, and to be honest most tin cans here are not the right kind. They have an extra lip  on the upper side, which prevents you from just slipping things you bake/steam in them out.


It was something I was craving today however  . . .  a Baked Bean Supper . . .  and I wanted Brown Bread with it and so I decided to take my old recipe and cut it in half to make a smaller batch.


I was really pleased with the results!  It turned out beautifully!  I used a 3 1/2 cup pudding basin (Mason Cash) to steam it in.  I steamed it in the top part of my double boiler/steamer.


No, its not the traditional shape that you will usually see Brown Bread being  . . .  but the taste is all there.  The texture is all there.  The smell is all there  . . .
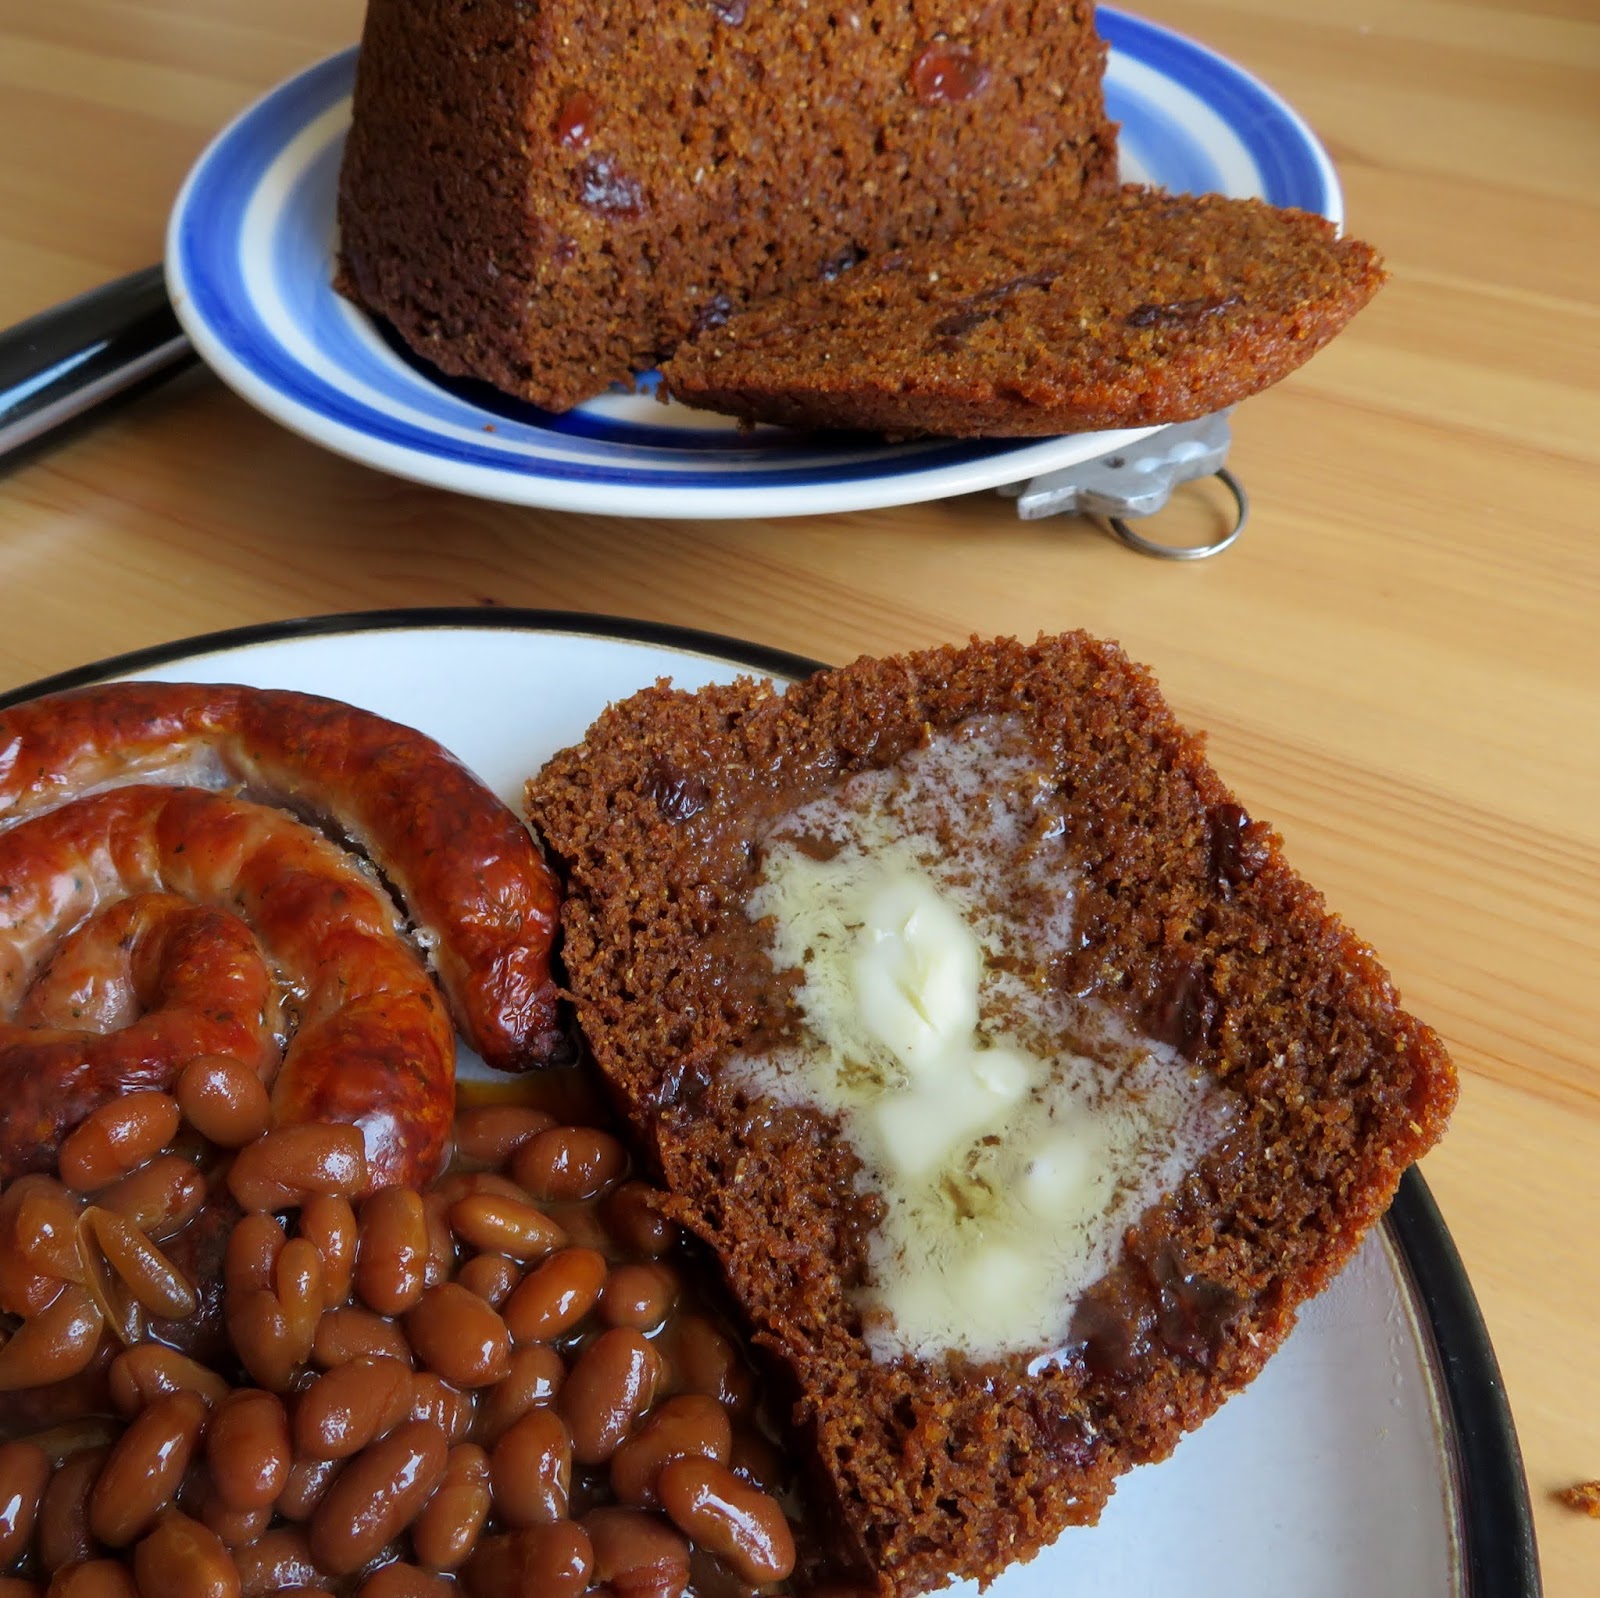

I didn't have any hotdogs to enjoy with it and my baked beans, but I did have some Cumberland Sausage wheels that I thought would work just as well . . .  they did.


Just look at that beautiful texure.  This was amazingly delicious  . . .


Especially spread with some cold butter  . . .  the richness of butter, melting down into that beautiful bread . . .


Rich and moreish, studded with little sticky raisins, perfect with the baked beans  . . .  it doesn't get much better than this . . .


Grandmother's Steamed Brown Bread
Print

Grandmother's Steamed Brown Bread

Yield: Makes 1 small loaf
Author:
Brown bread traditionally has been served with baked beans all up and down the East Coast of North America.  This is a delicious whole grain loaf, studded with raisins, that you steam.  This is a small batch recipe.

Ingredients:

  • 70g whole wheat flour (1/2 cup)
  • 70g rye flour (1/2 cup)
  • 85g cornmeal (1/2 cup)
  • 3/4 tsp bicarbonate of soda
  • 1/2 tsp salt
  • 85g molasses (3 fluid ounces)
  • 120g sour cream (1 cup)
  • 75g sultanas or raisins (1/2 cup)
  • a knob of butter to butter the pudding basin

Instructions:

  1. Have ready a large double boiler/steamer, fitted with a basket and a lid.  Fill the bottom with boiling water and keep warm.  Butter a 3 1/2 to 4 cup cylindrical mold or pudding basin well. Pleat a sheet of aluminium foil, large enough to cover the basin and set aside.
  2. Whisk all of the dry ingredients together in a bowl.  Stir in the raisins. Whisk the wet ingredients together in another bowl. Add to the dry ingredients and mix to combine well.
  3. Spoon into the pudding basin/mold to come 2/3 of the way up the bowl. Cover it with the buttered foil, butter side down and seal the edges around the boil. Tie it with some string.
  4. Place into the steamer pot and cover tightly with a lid.  Steam for 2 to 3 hours, topping up the pan with water as needed. When done a toothpick inserted in the centre should come out clean.
  5. Unmold onto a plate and serve warm, slathered with butter.  Delicious!
Did you make this recipe?
Tag @marierayner5530 on instagram and hashtag it #EnglishKitchen
Created using The Recipes Generator


Scalloped Potatoes on the side made this meal complete.  The only thing missing was my mother's Green Tomato Chow and a slab of Lemon Meringue Pie.   


Read more

Kamis, 04 Juni 2020

Mexican Scrambled Eggs and Soft Flour Tortillas


The other day I made us some tasty Mexican Scrambled Eggs for our lunch/supper.  We both enjoy Tex Mex flavours, and do enjoy a meal such as this every now and then. Quick each and incredibly delicious as well as being quite colourful! 


I decided to make my own tortillas for this.  I have a recipe of my own that I have been making for many years now. I started doing this back in the 1980's when mexican ingredients were not all that readily available.  You can get that recipe here.


My family loved my enchiladas and I started making my own tortillas so that I could make them enchiladas from my leftover turkey and other roasts. I had seen this recipe however on Pinterest from Cafe Sucre Farine.


I really wanted to try it.  They looked really good and I know that blog has a great reputation for producing good food.


I decided to use their recipe to make tortillas to serve with my Mexican Eggs.


The recipe was really easy to follow, although I always have had a problems rolling out perfect circles no matter what method I try to use.  I suspect that only a tortilla press will give me perfect circles.  These tortillas however, excellent. I highly recommend.  I have shared the British measurements here.

Soft Flour Tortillas
Print

Soft Flour Tortillas

Yield: Makes 16
Author:
These are simple to make and nice and soft.  Delicious as well! Adapted with British Measurements from Cafe Sucre Farine.

Ingredients:

  • 420g plain flour (3 cups all-purpose)
  • 1 tsp salt
  • 1 tsp baking powder
  • 80ml canola oil (1/3 cup)
  • 240ml warm water (1 cup)

Instructions:

  1. Measure the flour, salt and baking powder into the bowl of a stand mixer (fitted with a dough hook) or into a bowl.  Give it a good whisk together to combine.  Mix together the water and oil.  Drizzle this mixture into the flour with your mixer running on medium speed until a soft dough is formed. Reduce the speed to low and beat on low for a further minute or so until smooth.  I needed to add a tiny bit more flour. (If you are doing this with a hand mixture. Tip out and knead on a lightly floured surface until you have a smooth dough.) 
  2. Divide the dough into sixteen equal pieces.  Shape into balls. Flatten each ball slightly with your hands.  Cover with a clean soft kitchen towel and set aside to rest for fifteen minutes.  (You can leave to rest  for as much as 2 hours.)
  3. When you are ready to cook them, place each dough round, one at a time, onto a lightly floured surface and, using a floured rolling pin, roll out to a circle 6 to 7 inches in diameter. (Mine were not completely round as much as I tried. I think the only way to get them truly round is to use a tortilla press.) Do not stack them as they will stick together.
  4. Heat a 10 inch non-stick skillet over medium heat.  Working with one tortilla at a time, cook for 40 to 60 seconds on one side in the heated skillet (the tortilla should have some light brown blisters and some bubbles should appear on the uncooked side) and then flip over and cook for about 15 to 20 seconds longer. Remove from the skillet and stack in a covered container to keep warm while you cook the remaining ones.
  5. These will keep in the refrigerator for up to one week in an airtight container or a zip lock bag. You can freeze them for longer if you wish.  Separate them in the bag with a square of baking or greaseproof paper.
Did you make this recipe?
Tag @marierayner5530 on instagram and hashtag it #EnglishKitchen
Created using The Recipes Generator


They were perfect to serve with the Mexican Scrambled Eggs.  I like toast with my eggs. I am an egg and toast person.


Mexican Scrambled Eggs however deserve a different kind of bread to accompany them and soft flour tortillas are the way to go!


This is the perfect lunch dish (or breakfast) for two people, with plenty of colour and flavour.


Two kinds of peppers, red and green  . . .  chopped red onion  . . .  a bit of pickled jalapeno for heat and some chopped fresh tomato. I used quartered cherry tomatoes.  Softened and mixed with perfectly scrambled eggs.


I like to serve them with some jack cheese melted on top, a dollop of sour cream and then a garnish of chopped spring onions or chives.  These were fabulous.

Mexican Scrambled Eggs
Print

Mexican Scrambled Eggs

Yield: 2
Author:
These flavourful eggs make a great breakfast or lunch. Filled with plenty of colour and texture.

Ingredients:

  • 3 large free range eggs
  • 2 TBS milk
  • 1/2 medium red onion, chopped
  • 1/2 green pepper, chopped
  • 1/2 red pepper, chopped
  • 6 cherry tomatoes, quartered
  • 1 TBS chopped pickled jalapeno peppers
  • salt and pepper to taste
  • 2 TBS of butter
  • a handful of grated jack cheese to sprinkle
  • chopped chives or spring onion to garnish
  • sour cream
  • warm soft flour tortillas to serve

Instructions:

  1. Prepare your vegetables. Melt 1 TBS butter in a skillet. Add the onion and peppers. cook stirring until softened. Add the tomatoes and jalapeno pepper. Stir through and cook for one minute longer. Remove to a bowl. Keep warm. Wipe the pan clean.
  2. Beat the eggs together with the milk. Season lightly.
  3. Melt the butter in the skillet over medium heat. Once it begins to foam, pour in the egg mixture. Let set just until it begins to set on the bottom and around the edges, then begin to lie the cooked portion with a wooden spatula so that the uncooked portion can flow underneath. Repeat until the eggs are softly cooked. No stirring needed. They will be thickened through and yet still moist and fluffy.
  4. Fold in the cooked vegetables and stir though.  Scatter the cheese on top and allow to melt.   Add a dollop of sour cream and sprinkle with spring onions or chives.  Serve immediately with warm soft tortillas.
Did you make this recipe?
Tag @marierayner5530 on instagram and hashtag it #EnglishKitchen
Created using The Recipes Generator


I don't think you can go wrong if you are looking for a nice light breakfast or lunch for two. I would even serve these as a light supper with a salad on the side.  These beautiful tortillas also really added a special touch! 


Read more

Senin, 13 April 2020

Quick and Easy No Yeast Dinner Rolls


I saw this recipe for Quick and Easy No Yeast Dinner Rolls on Pinterest.  Actually I saw the same photograph on many sites, but none of them actually looked legitimate so, in all fairness, I don't really know who to give credit to. If you do, I will be more than happy to add their information on this post.


To be honest, I was completely intrigued. No yeast?  Quick and easy?  Small batch?  It was worth a go!


At the present moment, with this horrible virus, we are experiencing a shortage of flour, as well as yeast.  I have no idea why?  Its like they are the toilet paper of the food world I guess.


So when I saw the recipe for no yeast rolls, using only a cup of flour, and making only four rolls, I was immediately interested.  The photograph looked pretty good as well . . .  although having now baked them I can pretty much say that the photo they show on Pinterest has nothing to do with this recipe.


It happens.  I was not entirely disappointed however. The end result was quite good actually, and while not totally like a yeast roll, it was not so far removed from being similar to a yeast roll either either.


You can't even call them a muffin  . . .  because they bear no resemblance to a savoury muffin either.  The crumb and consistency is far more "bread-like" than "muffin-like."


As you can see they puffed up really nicely and have a beautiful crumb.  Filled with lots of nice holes, but not too many . . .


They are not crumbly in the least.  More like bread as I said, than a muffin  . . .


They took very well to being spread with butter . . . .


They went really well with our dinner which was a delicious Spam & Bean Bake.


They actually tasted really nice.  I was very pleasantly surprised. There is no fat in them with the exception of 2 TBS of mayonnaise, no eggs either.  I suspect the mayonnaise takes the place of both.


All in all I would consider this to be a winning recipe that I will absolutely make again.  I might even try to add some flavours to them, like perhaps some herbs and garlic powder . . . I think it is a basic recipe that you could very easily play with.


When I make them again I might substute some of the flour with some corn meal and some molasses for a portion of the milk.  Just a bit and add some raisins.  That would make them a bit like brown bread I think. We will see how it goes!  Watch this space.

Small Batch No Yeast Dinner Rolls

Small Batch No Yeast Dinner Rolls

Yield: makes 4 rolls
Author:
These are quick and easy to make and quite delicious.   If you are only wanting a few rolls, then this is the recipe to use.

Ingredients:

  • 140g plain flour (1 cup)
  • 1 1/2 tsp baking powder
  • 1/2 tsp salt
  • 120ml milk (1/2 cup)
  • 2 TBS mayonnaise

Instructions:

How to cook Small Batch No Yeast Dinner Rolls

  1. Preheat he oven to 190*C/375*F gas mark 5. Butter four muffin tin holes really well.
  2. Whisk together the flour, baking powder and salt.  Whisk together the milk and mayonnaise.  Add all at once to the flour mixture and whisk together to combine well.  Divide the batter between the four prepped muffin tin holes.
  3. Bake in the preheated oven for 18 to 20 minutes until well risen and golden brown.  Serve warm.

Did you make this recipe?
Tag @marierayner5530 on instagram and hashtag it #EnglishKitchen
Created using The Recipes Generator


If you are looking for a quick bread recipe, that doesn't use any yeast, not a lot of flour and has no fat per se, you can't get much better than this one.  I highly recommend! 


Read more